Here we would be looking at the detailed steps for Enabling TLS in Oracle Apps R12.2
Introduction:
The data between web browser and web server travels unencrypted in R12 application So the password and other information can be tracked by sniffer. We are avoiding this by implementing SSL in R12.
With SSL implementation, the data travels in the encrypted forms and Only web browser and web server can decrypt it.
The implementation requires the SSL certificate and configuration in the R12 environment as per the configuration
What is SSL?
SSL and TLS are the cryptographic protocol that ensures privacy between communicating applications and their users on the Internet
What is Transport Layer Security (TLS)
Transport Layer Security, or TLS, is the successor of SSL. TLS, like SSL, is a protocol that encrypts traffic between a client and a server. TLS creates an encrypted connection between two machines allowing for private information to be transmitted without the problems of eavesdropping, data tampering, or message forgery.
How SSL works
- The client sends a request to the server using HTTPS connection mode.
- The server presents its digital certificate to the client. This certificate contains the server’s identifying information like server name, Organization and server public key and digital signature of the CA private key
- The client (web browser) has the public keys of the all the CA. It decrypts the digital certificate private key This verification proves that the sender had access to the private key, and therefore is likely to be the person associated with the public key. If the verification goes good, the server is authenticated as a trusted server.
- The client sends the server a list of the encryption levels, or ciphers, that it can use.
- The server receives the list and selects the strongest level of encryption that they have in common.
- The client encrypts a random number with the server’s public key and sends the result to the server (which only the server should be able to decrypt with its private key); both parties then using the random number to generate a unique session key for subsequent encryption and decryption of data during the session
The ssl Implementation will depend on the topology of the R12 implementation. I am here highlighting all the major one.
TLS Termination Point
- A TLS termination point is the end-point server for the encrypted connection that has been initiated by a client (for example, a browser).
- In the case of Oracle E-Business Suite the Oracle HTTP Server can act as a TLS termination point. An alternate TLS termination point, such as a reverse proxy or load balancer, can be configured in front of the Oracle HTTP Server.
Various SSL topology
- A single webserver deployment with TLS terimination Point as webserver
This is pretty simple. We will need the digital certificate for the webserver. The steps are straight forward. The traffic between web browser and webserver will be encrypted
- Having a Load balancer which is serving to 2 or more webserver makes it little bit complicated
In this case, we could have following options
1.End to end encryption of traffic (TLS termination Point as webserver)
The entire traffic flow i.e. from browser to load balancer and from load balancer to web server is encrypted
There are two ways to do it
a) Pass-through configuration: The load balance in this case does not decrypt/encrypt the message .it just passes through the traffic to the webserver
b) Decryption/encryption: The load balance in this case decrypt the traffic at the load balancer level and then again encrypt it and send it to web server which again decrypt it
2. SSL terminator(Alternate TLS termination point): The traffic between web browser and load balancer is only encrypted. The Load balance acts as SSL terminator and terminate the SSL at the load balancer level and passes the unencrypted traffic to the webserver.
Steps to perform configuration on each topology is give below
A single webserver deployment with TLS terimination Point as webserver
Important Points
1) Upgrade to a minimum of Java Development Kit (JDK) 7.
The use of TLS 1.2 requires Java 7 at a minimum
2) Upgrade Oracle Fusion Middleware.
The use of TLS 1.2 requires Oracle Fusion Middleware 1.1.1.9
3) Apply product specific patches.
Oracle Workflow – Apply patch 22806350:R12.OWF.C to address an Oracle Workflow Notification Mailer issue.
Oracle iProcurement – Apply the patch(es) mentioned in My Oracle Support Knowledge Document 1937220.1, Oracle iProcurement, Exchange and OSN Fail After Supplier Site Migrates From SSLv3 to TLS Protocol (with SSL Handshake SSLIOClosedOverrideGoodbyeKiss), which corresponds to the appropriate application versions.
Oracle iPayment – Apply patch 22522877:R12.IBY.C.
Oracle XML Gateway – Apply patch 22326911:R12.ECX.C.
Step 1
Set Your Environment
The steps detailed in this section must be executed on the (running) run file system in order to ensure that during the next online patching the TLS setup is then propagated to the patch file system. There should not be an active patching cycle at this point. In order to check whether an Online Patching Cycle is already active or not, you can use the following command:
UNIX:
$ adop -status
- Log on to the Oracle E-Business Suite Release 12.2 application tier as the OS user who owns the installation files.
- The file system with the Applications context file variable s_file_edition_type set to ‘run’ denotes the run file system. Source your application tier environment file (<sid_machine>.env), located in the APPL_TOP directory on the run file system. Do not source the APPS<sid_machine>.env file, otherwise the 10.1.2 environment variables will be picked up and Oracle Wallet Manager 11g will fail to start. After sourcing the environment file, the $FILE_EDITION environment variable should be ‘run’.
- Set the PATH environment variable to include the Fusion Middleware location and DISPLAY variable for owm gui
For example
export PATH=$FMW_HOME/webtier/bin:$FMW_HOME/oracle_common/bin:$PATH
export DISPLAY=<hostname or ip address>:0.0
Step 2
Create a wallet
The s_web_ssl_directory location is still used by some Oracle E-Business Suite Release 12.2 components (for example, XML Gateway Transportation Agent OXTA) and during the Oracle Fusion Middleware cloning process.
We can find this location in below way
cat $CONTEXT_FILE|grep “s_web_ssl_directory”
Open the Wallet manager as a background process:
| $ owm & |
On the Oracle Wallet Manager Menu navigate to Wallet >
New.
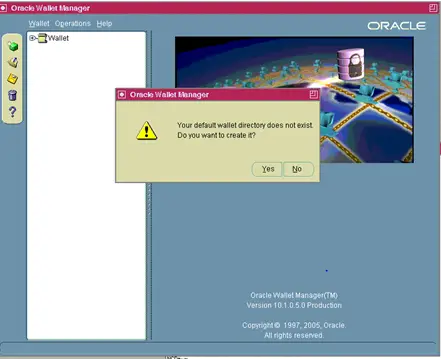
Answer NO to: Your default wallet directory doesn’t exist. Do you wish to create it now?
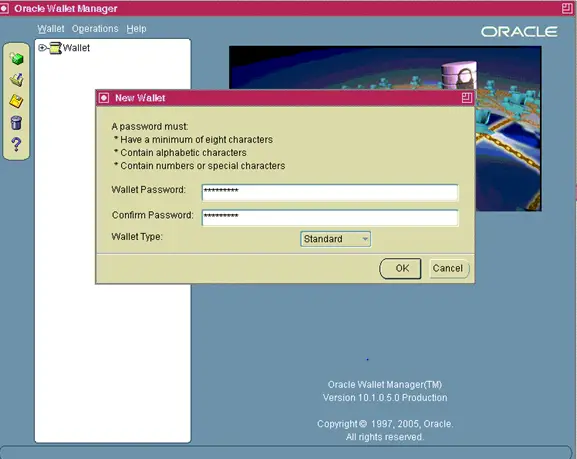
The new wallet screen will now prompt you to enter a password for your wallet
Enter the password and remember it
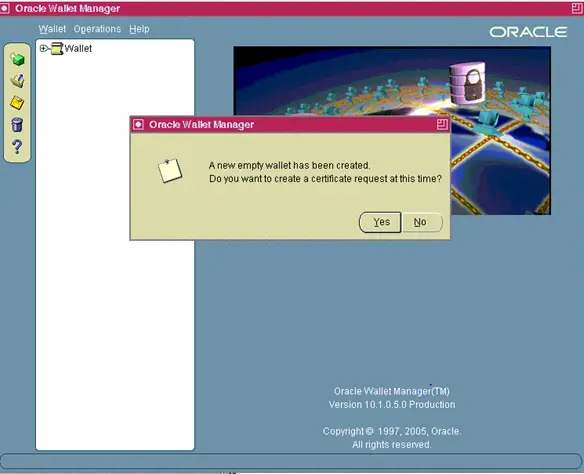
A new empty wallet has been created. Do you wish to create a certificate request at this time?
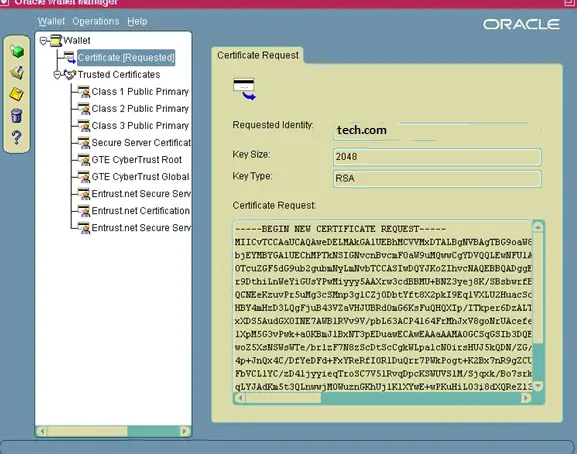
After clicking “Yes” in the Create Certificate Request Screen will pop up:
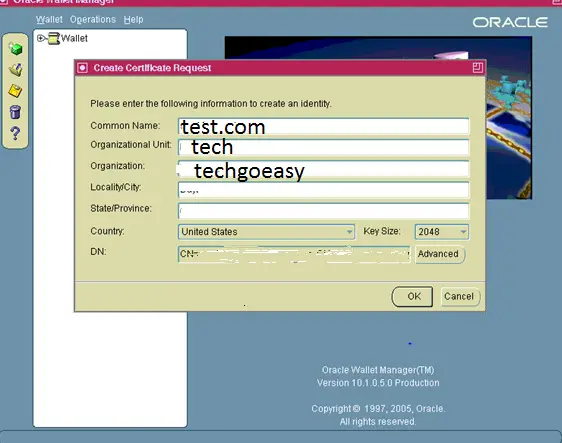
Fill in the appropriate values where:
| Common Name | It is the name of your server including the domain. |
| Organizational Unit: (optional) | The unit within your organization. |
| Organization | It is the name of your organization |
| Locality/City | It is your locality or city. |
| State/Province | is the full name of your State or Province do not abbreviate. |
Select your Country from the drop down list, and for the Key Size, select 2048 as a minimum. Click OK.
Click On certificate requested
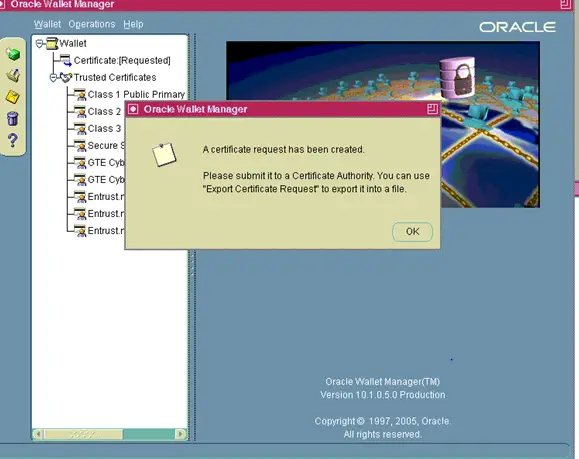
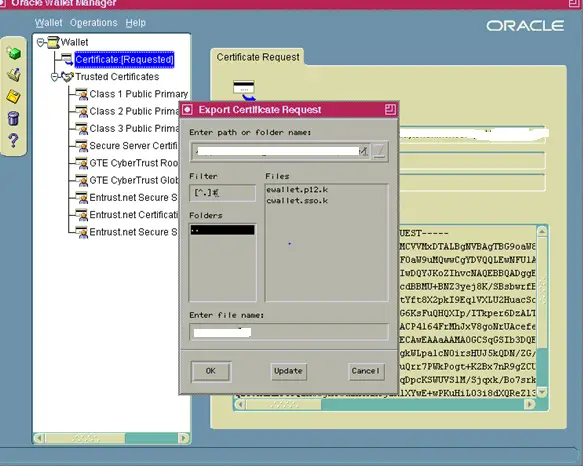
You will need to export the Certificate Request before you can submit it to a Certifying Authority.
- Click on Certificate [Requested] to Highlight it.
- From the menu click Operations >
Export Certificate Request
- Save the file as server.csr
- From the menu click Wallet and then click Save.
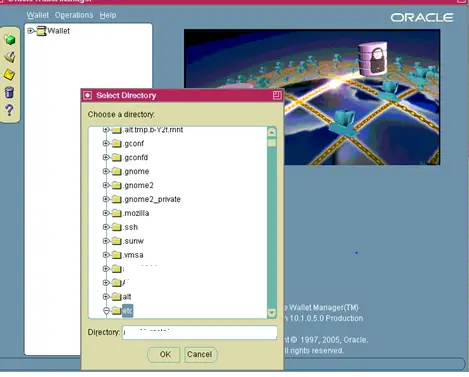
- On the Select Directory screen change the Directory to your fully qualified wallet directory.
- Click OK.
- From the menu click Wallet and check the Auto Login box.
Be sure to make this password something you will remember. You will need to use the password whenever you open the wallet with Oracle Wallet Manager or perform operations on the wallet using the Command Line Interface. With auto login enabled processes submitted by the OS user who created the wallet will not need to supply the password to access the wallet.
- Exit the Wallet Manager.
The wallet directory will now contain the following files:
cwallet.sso
ewallet.p12
server.csr
You may now submit server.csr to your Certifying Authority to request a Server Certificate
Save the wallet using wallet and save and give the directory path
Submit the certificate request to a certificate authority.
Note: Signature Algorithm Changes
Industry standards for encryption algorithms are constantly under review. Certificates issued with a SHA-1 based signature hash algorithm as an industry standard are being phased out. Many certificate authorities are recommending or mandating SHA-2 as the minimum signature algorithm for issuing certificates. The time frame for moving to SHA-2 varies depending upon the certificate authority that is used. The requirement for SHA-2 also impacts intermediate certificates which must also be SHA-2 in order to chain back to the end-entity SHA-2 certificate issued. Root certificates are not impacted.
Reference the following My Oracle Support Knowledge Documents for more information:
Document 1448161.1, How To Produce CSR With A SHA-1 Or Better Signature Algorithm
Document 1275428.1, Support Status for SHA-2 in Oracle Application Server (10.1.2.X.X/10.1.3.X.X) and Fusion Middleware 11g (11.1.1.X)
Document 1939223.1, Is it Possible to Generate SHA-2 Certificate Signing Requests with Oracle Wallet Manager or ORAPKI in FMW11g
Depending on your certificate provider, MD5 based certificate requests (CSR) generated by Oracle Wallet Manager (OWM) may not be accepted.
For example, Symantec will now only accept SHA-1 2048-bit based CSRs or higher. Due to a current limitation in both OWM and orapki, they are incapable of generating anything other than MD5 based CSRs. OWM can accept SHA-2 or above trusted certificates and server certificates, it just cannot generate them.
In these cases, the workaround is to make use of OpenSSL to generate the CSR. An example of this process is provided below.
- Use OpenSSL to take the existing wallet and save it as a new PEM format file:
openssl pkcs12 -in ewallet.p12 -nodes -out nonoracle_wallet.pem
Use OpenSSL to generate the request specifying SHA-2:
openssl req -new -key nonoracle_wallet.pem -sha256 -out server.csr
At this point, OpenSSL will prompt you for the request attributes. Be sure to enter the same data you entered when creating the CSR in OWM .Do not specify a ‘challenge password’ as this has been deemed to be insecure by most certifying authorities.
- The csr should now be submitted to your certificate authority to request a server certificate.
- Upon receiving your newly issued certificate, you can import this into your wallet using OWM continuing with the next step below
Step 5
Import your Server Certificate to the Wallet
After you receive your Server Certificate from your Certifying Authority you will need to import it into your wallet. Copy the certificate to server.crt in the wallet directory on your server by one of the following methods:
- ftp the certificate (in binary mode)
- copy and paste the contents into server.crt
Follow these steps to import server.crt into your wallet:
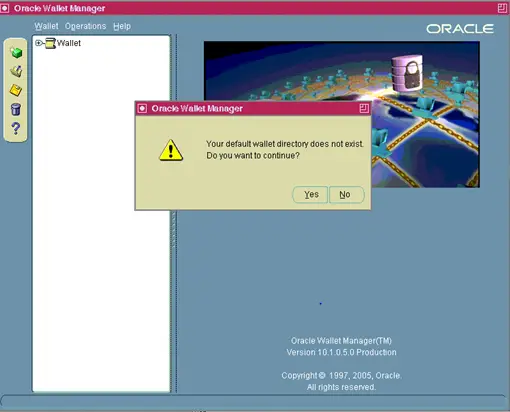
- Open the Wallet Manager as a background process:
$ owm &
- From the menu click Wallet then Open.
- Answer Yes when prompted:
Your default wallet directory does not exist.
Do you want to continue?
- On the Select Directory screen change the Directory to your fully qualified wallet directory and
click OK
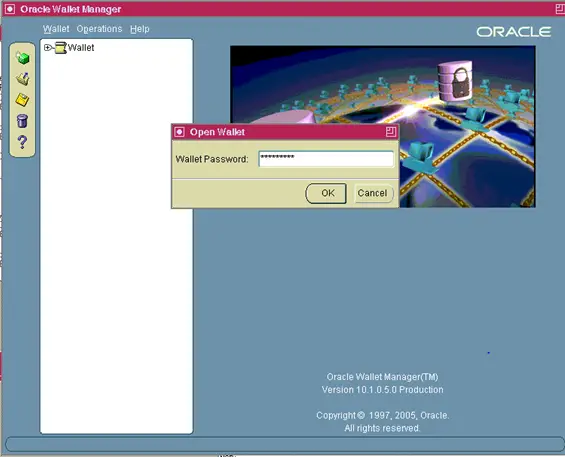
- Enter your wallet password and click OK.
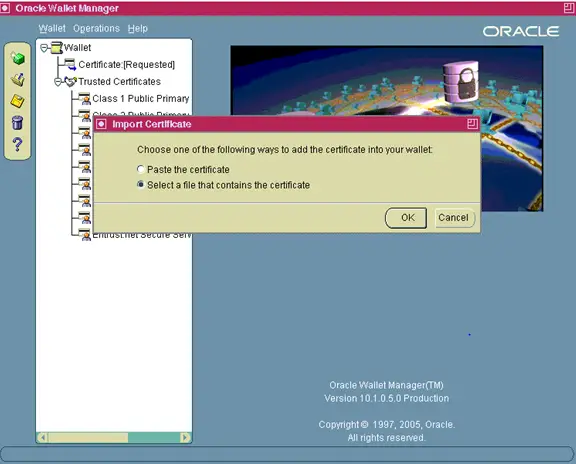
- On the Oracle Wallet Manager Menu navigate to Operations Import User Certificate. Server certificates are a type of user certificate. Since the Certifying Authority issued a certificate for the server, placing its distinguished name (DN) in the Subject field, the server is the certificate owner, thus the “user” for this user certificate.
- Click OK.
- Double Click on server.crt to import it.
- Save the wallet:
- On the Oracle Wallet Manager Menu click Wallet.
- Verify the Auto Login box is checked.
- Click Save
Note: If all trusted certificates that make up the chain of server.crt are not present in the wallet, then adding the certificate will fail. When the wallet was created, the certificates for the most common CA’s (such as VeriSign, GTE, and Entrust) were included automatically. Contact your certifying authority if you need to add their certificate, and save the provided file as ca.crt in the wallet directory in a base64 format. Another option is to follow the instructions given below to create ca.crt from your server certificate (server.crt). If your Certifying Authority provided an intermediate certificate (to complete the chain) then save the provided file as intca.crt in a Base64 format, this will need to be imported into Oracle Wallet Manager prior to importing the server.crt. Certificates that comprise several parts (such as the P7B type) would also fall into this category
Creating your Certifying Authority’s Certificate
To create ca.crt
- Copy server.crt to your PC (if necessary) using one of the following methods:
ftp (in binary mode) server.crt to your pc .
copy the contents of server.crt and paste into notepad on the PC. Save the file as server.crt
- Double click on server.crt to open it with the Cyrpto Shell Extension.
- On the Certification Path tab click on the first (top) line and then View Certificate.
- On Details tab click Copy to File, this will start the export wizard.
- Click Next to continue.
- Select Base64 encoded X.509 (.CER) and click next.
- Click Browse and navigate to the directory of your choice.
- Enter ca.crt as the name and click ok to export the certificate.
- Close the wizard.
- Copy ca.crt back to your wallet directory (if necessary) using one of the following methods:
ftp (in binary mode) ca.crt to your application tier wallet directory
copy the contents of ca.crt and paste into a new file in your application tier wallet directory using a text editor. Save the file as ca.crt
Detailed steps to Import Certificate with screen shots
| owm & |
Then click wallet -> open
Click yes
Enter the full path of the wwallet directory
Enter the wallet password
Now Operations : Import User certficate
Alternatively you can add the certificate
orapki wallet add \
 -wallet . \
-trusted_cert \
-cert ca.cer \
-pwd <pwd>

orapki wallet add \
-wallet . \
-trusted_cert \
-cert intca.cer \
-pwd <pwd>


orapki wallet add \
-wallet .\
-user_cert \
-cert tech.cer \
-pwd <pwd>
If you need to import the CA Certificate you will also need to add the contents of ca.crt file to b64InternetCertificate.txt file located in the 10.1.2 ORACLE_HOME/sysman/config directory:
$ cat ca.crt >> <10.1.2 ORACLE_HOME>/sysman/config/b64InternetCertificate.txt
If you were also provided an Intermediate Certificate (intca.crt) then you will also need to add that to the b64InternetCertificate.txt:
$ cat intca.crt >> <10.1.2 ORACLE_HOME>/sysman/config/b64InternetCertificate.txt
Step 6 – Modify the Oracle HTTP Server wallet.
The <s_web_ssl_directory>/Apache is still used by some Oracle E-Business Suite Release 12.2 components, but is not used by the Oracle HTTP Server.
Copy the <s_web_ssl_directory>/Apache wallet (cwallet.sso ) to <s_ohs_instance_loc>/config/OHS/<s_ohs_component>/keystores/default directory location
You can find these variable from Context file
cat $CONTEXT_FILE|grep “s_ohs_instance_loc”
cat $CONTEXT_FILE|grep “s_ohs_component”
Step 7 – Modify the OPMN wallet and configure the cipher suites.
Modify the OPMN Wallet
The default location for the OPMN wallet is in the <s_ohs_instance_loc>/config/OPMN/opmn/wallet directory.
We can find this location in below way
cat $CONTEXT_FILE|grep “s_ohs_instance_loc”
- Navigate to the <s_ohs_instance_loc>/config/OPMN/opmn/wallet directory.
- Move the existing wallet files to a backup directory in case you wish to use them again in the future.
- Copy the cwallet.sso files from the <s_ohs_instance_loc>/config/OHS/<s_ohs_component>/keystores/default directory to the current directory.
Configure the OPMN Cipher Suites
You must perform this configuration to enforce strong cipher suites on the OPMN remote port.
- Ensure all processes are down.
- Open the opmn.xml file located under your web tier instance.
- Towards the top of the file, look for the SSL options within the <notification-server> section.
Change:
<ssl enabled=”true”
wallet-file=”<path to the wallet file>”/>
to
<ssl enabled=”true”
wallet-file=”<Path to the Wallet file>” ssl-versions=”TLSv1.0″
ssl-ciphers=”<Pick two ciphers from the list of valid ciphers below,separated by a comma>”/>
The following list specifies the valid cipher suites that can be used:
- SSL_RSA_WITH_AES_256_CBC_SHA
- SSL_RSA_WITH_AES_128_CBC_SHA
- SSL_RSA_WITH_3DES_EDE_CBC_SHA
For example:
<ssl enabled=”true”
wallet-file=”/EBS_web_EBSDB_OHS1/config/OPMN/opmn/wallet” ssl-versions=”TLSv1.0″
ssl-ciphers=”SSL_RSA_WITH_AES_128_CBC_SHA,SSL_RSA_WITH_3DES_EDE_CBC_SHA”/>
Edit the admin.conf file.
Change:
SSLCipherSuite SSL_RSA_WITH_RC4_128_SHA
SSLProtocol nzos_Version_1_0 nzos_Version_3_0
to
SSLCipherSuite <pick a valid cipher from the list above>:<pick another valid cipher from the list above>
SSLProtocol nzos_Version_1_0 nzos_Version_1_1 nzos_Version_1_2
Step 8 – Modify the Oracle Fusion Middleware Control Console.
Fusion Middleware Control Console utilizes the functionality of OPMN to manage your Oracle Fusion Middleware Enterprise.
Move the existing wallet files to a backup directory in case you wish to use them again in the future.
- $EBS_DOMAIN_HOME/opmn/<s_ohs_instance>/<s_ohs_component>/wallet
- $EBS_DOMAIN_HOME/opmn/<s_ohs_instance>/wallet
- $FMW_HOME/webtier/instances/<s_ohs_instance>/config/OHS/<s_ohs_component>/proxy-wallet
We can find this location in below way
cat $CONTEXT_FILE|grep “EBS_DOMAIN_HOME”
Copy the cwallet.sso file from the <s_ohs_instance_loc>/config/OPMN/opmn/wallet directory to all three locations mentioned above.
Note: In the case of a shared file system and multinode configuration, updates to the first two directories are done on the primary node, and updates to the third directory are done on the respective applications tier node where OHS is being configured for TLS. The reason being is that the first two directories will only exist on the primary node, and the third directory will only exist on each applications tier node where OHS is enabled.
Step 9
Use Oracle Fusion Middleware Control to make some additional configuration file changes:
- Log in to Oracle Fusion Middleware Control Console (for example, http://<hostname>.<domain>:<AdminServer Port>/em).
- Select Web Tier Target under EBS Domain.
- Select Administration > Advanced Configuration.
- Select ssl.conf file for edit.
- Update the Listen <port> and the VirtualHost _default_:<port> directives to SSL port, for example Listen 4443.
- Update the SSLProtocol and SSLCipherSuite entry to match the following:
SSLProtocol TLSv1 TLSv1.1 TLSv1.2
SSLCipherSuite HIGH:MEDIUM:!aNULL:!RC4:+HIGH:+MEDIUM
7. Click Apply.
The following command should be run (on all application tier nodes) to propagate the changes made through the Oracle Fusion Middleware Control Console to the context file variables:
perl $AD_TOP/bin/adSyncContext.pl contextfile=$CONTEXT_FILE
Enter the APPS user password:
Enter the WebLogic AdminServer password:
Review the adSyncContext.log for the changes that have been picked up and made to the context file.
Use the Oracle E-Business Suite 12.2 – OAM Context Editor to change the TLS related variables shown in this table:
| TLS-Related Variables in the Context File | ||
| Variable | Non-TLS Value | TLS Value |
| s_url_protocol | http | https |
| s_local_url_protocol | http | https |
| s_webentryurlprotocol | http | https |
| s_active_webport | same as s_webport | same as s_webssl_port |
| s_webssl_port | not applicable | default is 4443 |
| s_https_listen_parameter | not applicable | same as s_webssl_port |
| s_login_page | url constructed with http protocol and s_webport | url constructed with https protocol and s_webssl_port |
| s_external_url | url constructed with http protocol and s_webport | url constructed with https protocol and s_webssl_port |
The value of the s_webport is based on the default port prior to any TLS configuration and remains unchanged when switching to TLS
Step 10 – Run Autoconfig
Autoconfig can be run by using the adautocfg.sh script in the Application Tier $ADMIN_SCRIPTS_HOME directory.
Step 11 – Restart the Application Tier services
Use the adapcctl.sh script in the $ADMIN_SCRIPTS_HOME directory to stop and restart the Application Tier Apache services.
Step 12 – Propagate TLS changes to patch file systems.
The following steps must be performed in order to synchronize the TLS setup between the two file systems:
- Edit $APPL_TOP_NE/ad/custom/adop_sync.drv.
- Assuming the rsynccommand is available on UNIX, the following directives must be copied and pasted between the <Begin Customization> and <End Customization> section after the existing <#Copy Ends>:
# Required for TLS setup migration from RUN to PATCH file-system.
# Please alter the commands in the event that rsync is not available or the platform does not support the example syntax.#10.1.2 b64InternetCertificate.txt
rsync -zr %s_current_base%/EBSapps/10.1.2/sysman/config/b64InternetCertificate.txt %s_other_base%/EBSapps/10.1.2/sysman/config/b64InternetCertificate.txt#Oracle HTTP Server Wallet – cwallet.sso
rsync -zr %s_current_base%/FMW_Home/webtier/instances/%s_ohs_instance%/config/OHS/%s_ohs_component%/keystores/default/cwallet.sso %s_other_base%/FMW_Home/webtier/instances/%s_ohs_instance%/config/OHS/%s_ohs_component%/keystores/default/cwallet.sso#OPMN Wallet – cwallet.sso
rsync -zr %s_current_base%/FMW_Home/webtier/instances/%s_ohs_instance%/config/OPMN/opmn/wallet/cwallet.sso %s_other_base%/FMW_Home/webtier/instances/%s_ohs_instance%/config/OPMN/opmn/wallet/cwallet.sso#Fusion Middleware Control Wallets – cwallet.sso
rsync -zr %s_current_base%/FMW_Home/user_projects/domains/EBS_domain_%s_dbSid%/opmn/%s_ohs_instance%/%s_ohs_component%/wallet/cwallet.sso %s_other_base%/FMW_Home/user_projects/domains/EBS_domain_%s_dbSid%/opmn/%s_ohs_instance%/%s_ohs_component%/wallet/cwallet.sso
rsync -zr %s_current_base%/FMW_Home/user_projects/domains/EBS_domain_%s_dbSid%/opmn/%s_ohs_instance%/wallet/cwallet.sso %s_other_base%/FMW_Home/user_projects/domains/EBS_domain_%s_dbSid%/opmn/%s_ohs_instance%/wallet/cwallet.sso
rsync -zr %s_current_base%/FMW_Home/webtier/instances/%s_ohs_instance%/config/OHS/%s_ohs_component%/proxy-wallet/cwallet.sso %s_other_base%/FMW_Home/webtier/instances/%s_ohs_instance%/config/OHS/%s_ohs_component%/proxy-wallet/cwallet.sso
Steps to be used when going for SSL terminator
There is no need for certificate creation and installation on the web server. In this case, we just need to set the context file parameter given below
Use Oracle Fusion Middleware Control to make some additional configuration file changes:
- Log in to Oracle Fusion Middleware Control Console (for example, http://<hostname>.<domain>:<AdminServer Port>/em).
- Select Web Tier Target under EBS Domain.
- Select Administration > Advanced Configuration.
- Select ssl.conf file for edit.
- Update the ServerName directive to the TLS termination point setup <hostname>.<domain>.
- Click Apply.
- Select httpd.conf file for edit.
- Update the ServerName directives to the TLS termination point setup <hostname>.<domain>.
- Click Apply.
Use the Oracle E-Business Suite 12.2 – Oracle Applications Manager (OAM) Context Editor to change the TLS related variables shown in this table:
| Changes When Using a TLS Termination Point Other than OHS (such as a load balancer or reverse proxy) | ||
| Variable | Non-TLS Value | TLS Value |
| s_url_protocol | http | http |
| s_local_url_protocol | http | http |
| s_webentryurlprotocol | http | https |
| s_active_webport | same as s_webport | TLS termination point external port |
| s_webentryhost | same as s_webhost | TLS termination point hostname |
| s_webentrydomain | same as s_domainname | TLS termination point domain name |
| s_enable_sslterminator | # | Remove the ‘#’ to use ssl_terminator.conf |
| s_login_page | url constructed with http protocol and s_webport | Construct url with https protocol, s_webentryhost, s_webentrydomain, s_active_webport |
| s_external_url | url constructed with http protocol and s_webport | Construct url with https protocol, s_webentryhost, s_webentrydomain, s_active_webport |
The value of the s_webport is based on the default port prior to any TLS configuration, and remains unchanged when switching to TLS.
Run Autoconfig
Autoconfig can be run by using the adautocfg.sh script in the Application Tier $ADMIN_SCRIPTS_HOME directory.
Restart the Application Tier services
Use the adapcctl.sh script in the $ADMIN_SCRIPTS_HOME directory to stop and restart the Application Tier Apache services.
Steps for End to end encryption with Pass through configuration on Load Balancer
1) All the steps given for single web server need to be executed.
2) The certificate need to be created with load balancer Name
3) We can execute the certificate steps on one Node and then copy all the steps to the other nodes
Context value changes
| TLS-Related Variables in the Context File | ||
| Variable | Non-TLS Value | TLS Value |
| s_url_protocol | http | https |
| s_local_url_protocol | http | https |
| s_webentryurlprotocol | http | https |
| s_active_webport | same as s_webport | same as s_webssl_port |
| s_webssl_port | not applicable | default is 4443 |
| s_https_listen_parameter | not applicable | same as s_webssl_port |
| s_login_page | url constructed with http protocol and s_webport | url constructed with https protocol and s_webssl_port |
| s_external_url | url constructed with http protocol and s_webport | url constructed with https protocol and s_webssl_port |
Run Autoconfig
Autoconfig can be run by using the adautocfg.sh script in the Application Tier $ADMIN_SCRIPTS_HOME directory.
Restart the Application Tier services
Use the adapcctl.sh script in the $ADMIN_SCRIPTS_HOME directory to stop and restart the Application Tier Apache services.
Steps for End to end encryption with Encryption/decryption on Load Balancer
1) All the steps given for single web server need to be executed.
2) The certificate need to be created at load balancer level and web node level also. It need to be created with load balancer Name on both the side
3) We can execute the certificate steps on one Web Node and then copy all the steps to the other nodes
4) The Load balance should have the client SSL certificate for the Web node certificate
Context value changes
| SSL Related Variables in the Context File | ||
| Variable | Non-SSL Value | SSL Value |
| s_url_protocol | http | https |
| s_local_url_protocol | http | https |
| s_webentryurlprotocol | http | https |
| s_active_webport | same as s_webport | same as s_webssl_port |
| s_webssl_port | not applicable | default is 4443 |
| s_https_listen_parameter | not applicable | same as s_webssl_port |
| s_login_page | url constructed with http protocol and s_webport | url constructed with https protocol and s_webssl_port |
| s_external_url | url constructed with http protocol and s_webport | url constructed with https protocol and s_webssl_port |
Both the ssl.conf and httpd.conf will have the ServerName pointing to the local host, rather than the web entry host of the TLS termination point.
In the case of a TLS termination point used, the configuration will generally consist of two profiles: a client SSL profile and a server SSL profile. Each profile will reference the corresponding certificate information of the other. Essentially, the TLS offloader needs to be aware of the TLS certificate information on the EBS side and EBS in turn needs to be aware of the TLS certificate information of the TLS termination point. Consult the documentation relevant to your TLS termination point for information on the proper configuration.
The example here is based on use of F5 BIG-IP TLS Accelerator:
SSL Client:
Parent Profile = clientssl
Certificate & Key = Subject Alternative Name (SAN) based certificate installed on BIG-IP
Chain = Intermediate chain certificate specified
SSL Server:
Parent Profile = serverssl
Certificate & Key = Basic certificate issued to the EBS instance
Chain = Intermediate chain certificate specified
We advise that both sides of the TLS configuration be tested independently. For example, test to make sure your EBS instance works with the TLS termination point first, revert the change, and then test that TLS configured only for EBS works. Once it is confirmed that both configurations work for TLS, you can commit to the end-to-end TLS configuration by re-introducing the TLS termination point.
An example of the protocol flow in this scenario:
client https request > TLS Off-loader (https:443) > EBS TLS (https:4443)
There are two distinct TLS certificate chains in play, therefore the TLS handshake and negotiation must complete in order for the communication to be successful. Any break in this flow will result in TLS protocol errors. In this example, the TLS termination point is operating on the general default port of 443, while EBS is configured to operate on port 4443.
Run Autoconfig
Autoconfig can be run by using the adautocfg.sh script in the Application Tier $ADMIN_SCRIPTS_HOME directory.
Restart the Application Tier services
Use the adapcctl.sh script in the $ADMIN_SCRIPTS_HOME directory to stop and restart the Application Tier Apache services.
Configure Loopback and Outbound Connections
Step 1 – Update the managed server (WLS) configuration.
Append the following JVM parameter to all managed servers and the WebLogic administration server:
- Log in to Oracle Fusion Middleware Administration Console (for example, http://<hostname>.<domain>:<AdminServer Port>/console)
- Click on Lock & Edit.
- Under Domain Structure > your EBS domain > Environment and Servers, select one of the managed servers. (Note that you will need to repeat this for all managed servers and the WebLogic administration server in your environment.)
Then under the Server Start tab in the Arguments section, add the following:
-Dhttps.protocols=TLSv1,TLSv1.1,TLSv1.2
- Click on Save.
- Repeat steps 3 and 4 for all remaining managed servers.
- Click on Activate Changes.
Step 2 – Update the b64InternetCertificate.txt Truststores
Add the contents of the ca.crt file to b64InternetCertificate.txt file.
If you need to import the CA Certificate, you will also need to add the contents of the ca.crt file to the b64InternetCertificate.txt file located in the 10.1.2 ORACLE_HOME/sysman/config directory:
$ cat ca.crt >> <10.1.2 ORACLE_HOME>/sysman/config/b64InternetCertificate.txt
Step 3 – Update the cacerts Truststore
- Update the JDK cacerts file.
Oracle Web Services requires the certificate of the certifying authority who issued your server certificate (ca.crt from the previous step) to be present in the JDK cacerts file. In addition, some features of XML Publisher and BI Publisher require the server certificate (server.crt from previous step) to be present. - Navigate to the $OA_JRE_TOP/lib/security directory.
- Follow these steps to ensure these requirements are met:
- Backup the existing cacerts file.
- Copy your ca.crt and server.crt files to this directory and issue the following command to insure that cacerts has write permissions:
| $ chmod u+w cacerts 4. Add your Apache ca.crt and server.crt to cacerts:$ keytool -import -alias ApacheRootCA -file ca.crt -trustcacerts -v -keystore cacerts $ keytool -import -alias ApacheServer -file server.crt -trustcacerts -v -keystore cacerts If you were also provided an Intermediate Certificate (intca.crt) then you will also need to add that to the cacerts before adding the server.crt: $ keytool -import -alias ApacheRootCA -file ca.crt -trustcacerts -v -keystore cacerts $ chmod u-w cacerts |
Step 4 Database tier setup
Oracle products such as Oracle Configurator, Order Management, Order Capture, Quoting, iPayment, iStore, and Pricing are leveraging the database as an HTTP client. The implementation of TLS for the Oracle Database Server (which acts as a client sending requests to the Web server) makes use of the Oracle Wallet Manager for setting up an Oracle wallet.
Note: This is a mandatory requirement for Oracle iStore storefront pages when the web tier is TLS enabled.
To enable the HTTPS client request from the database using UTL_HTTP, you need to establish a truststore in wallet format. You do not need a server certificate for this wallet. You only need to import the root CA certificate for the root CAs that are the trust anchor for the sites you need UTL_HTTP to connect to.
- After setting your environment for the database tier, navigate to the $ORACLE_HOME/appsutil directory.
- Create a new wallet directory named wallet.
- Navigate to the newly created wallet directory.
- Open the Oracle Wallet Manager as a background process.
owm &
- In the Oracle Wallet Manager Menu, navigate to Wallet > New.
Answer NO to: Your default wallet directory doesn’t exist. Do you wish to create it now? The new wallet screen will now prompt you to enter a password for your wallet. Click NO when prompted: A new empty wallet has been created. Do you wish to create a certificate request at this time? - If you need to import ca.crt, on the Oracle Wallet Manager menu navigate to Operations > Import Trusted Certificate. Click OK. Double click on ca.crt to import it.
- Save the wallet: On the Oracle Wallet Manager Menu, click Wallet. Verify the Auto Login check box is selected. Click Save.
To test that the wallet is properly set up and accessible, log in to SQLPLUS as the apps user and execute the following:
SQL>select utl_http.request('[address to access]', '[proxy address]', 'file:[full path to wallet directory]', null) from dual;
where:
‘[address to access]’ = the URL for your Oracle E-Business Suite Rapid Install Portal.
‘[proxy address]‘ = the URL of your proxy server, or NULL if not using a proxy server.
‘file:[full path to wallet directory]’ = the location of your wallet directory (do not specify the actual wallet files).
Related links
Enabling SSL or TLS in Oracle E-Business Suite Release 12 (Doc ID 2143099.1)
How to find R12 components Version
40 Adpatch question every DBA should know
awk command
Keytool command
hi
What are the pros and cons for below:-
“OHS as the TLS Termination Point” or “Alternate TLS Termination Point”
Is “Loopback ” a mandaroy step