Here in this post, we will be looking at how to upgrade an existing 12c database to 19c Database. Here is the high-level summary of the steps
- Installation of Oracle 19c Oracle Home
- Preupgrade Checks
- 19c Upgrade
- PostUpgrade Checks
Installation of Oracle 19c Oracle Home
You can take a look at the below article for detailed step-by-step instructions to install Oracle 19c Oracle Home.
Step by Step Oracle 19c Database Installation on Linux
Once the installation is done, we can move forward with the next steps. i.e PreUpgrade checks
Preupgrade Checks
(1) Ensure that all database components/objects provided by Oracle are VALID in the source database prior to starting the upgrade.
Here is the script to check for components status
set pagesize 500
set linesize 300
col COMP_NAME format a40;
select substr(comp_name,1,40) comp_name, status, substr(version,1,10) version from dba_registry order by comp_name;
Here is the script to check for invalid object status before the upgrade
col OBJECT_NAME format a30;
col OWNER format a20
select substr(object_name,1,40) object_name,substr(owner,1,15) owner,object_type
from dba_objects where status='INVALID' order by owner,object_type;
(2) Ensure that you do not have duplicate objects in the SYS and SYSTEM schema
cd <location of the script>
$ sqlplus / as sysdba
sql> alter session set nls_language='American';
sql> @dbupgdiag.sql
sql> exit
(3) Timezone should be less than or equal to the target database timezone version.
The time zone files that are supplied with Oracle Database 19c are version 32.
We can check the pre-upgraded database timezone as
SQL> select version from v$timezone_file;
if < 32, then this database upgrade will upgrade the database to Timezone version 32
if > 32, then BEFORE the upgrade you MUST patch the target 19c $ORACLE_HOME with a timezone data file of the SAME version as the one used in the source release database.
(4) Verifying Materialized View Refreshes are Complete Before Upgrade
Use this procedure to query the system to determine if there are any materialized view refreshes still in progress. Before upgrading Oracle Database, you must wait until all materialized views have completed refreshing.
SELECT o.name FROM sys.obj$ o, sys.user$ u, sys.sum$ s WHERE o.type# = 42 AND bitand(s.mflags, 8) =8;
(5) Ensuring That No Files Are in Backup Mode and no files need media recovery Before Upgrading
Execute below query to check for the status of the backup:
SQL> SELECT * FROM v$backup WHERE status != 'NOT ACTIVE';
Ensure that no files require media recovery:
SQL> SELECT * FROM v$recover_file;
(6) Gathering Optimizer Statistics to Decrease Oracle Database Downtime
SQL> EXEC DBMS_STATS.GATHER_DICTIONARY_STATS;
(7) Purging Recycle Bin before the upgrade
SQL> PURGE DBA_RECYCLEBIN;
(8) Check the accounts use Case-Insensitive password version
col USERNAME format a40;
SELECT USERNAME,PASSWORD_VERSIONS,account_status FROM DBA_USERS;
If there are any 10g versions, suggest you to refer Oracle documentation to fix 10g versions, failing to do so, user accounts with LOCKED after the upgrade is completed.
(9) About Password Case Sensitivity
Ensure that you do not have the deprecated parameter SEC_CASE_SENSITIVE_LOGON set to FALSE.
(10) Run Pre-Upgrade information tool script
$Earlier_release_Oracle_home/jdk/bin/java -jar $New_release_Oracle_home/rdbms/admin/preupgrade.jar [FILE|TERMINAL] [TEXT|XML] [DIR output_dir]
FILE|TERMINAL – Use this option to direct script output to a file. Use TERMINAL to direct output to the terminal. If it is not specified then the default is FILE.
TEXT – Use this option to specify log should be in Text format. Use TEXT to specify text output. Use XML to specify XML output. If you do not specify an output type, then the default is text.
DIR – Logs will be created under <output_dir>. Directs the output to a specific directory. If you do not specify an output directory with the DIR option, then the output is directed to one of the default locations: If you define ORACLE_BASE environment variable then the generated scripts and log files will be created under $ORACLE_BASE/cfgtoollogs/<dbname>/preupgrade/ location else it will create under $ORACLE_HOME/cfgtoollogs/db_name/preupgrade/.
$ORACLE_HOME/jdk/bin/java -jar /uf00/oracle/product/19.0.0.0/rdbms/admin/preupgrade.jar FILE TEXT
We can look at the file generated
==================
PREUPGRADE SUMMARY
/uf01/app/oracle/cfgtoollogs/TEST/preupgrade/preupgrade.log
/uf01/app/oracle/cfgtoollogs/TEST/preupgrade/preupgrade_fixups.sql
/uf01/app/oracle/cfgtoollogs/TEST/preupgrade/postupgrade_fixups.sql
Execute fixup scripts as indicated below:
Before upgrade:
Log into the database and execute the preupgrade fixups
@/uf01/app/oracle/cfgtoollogs/TEST/preupgrade/preupgrade_fixups.sql
After the upgrade:
Log into the database and execute the postupgrade fixups
@/uf01/app/oracle/cfgtoollogs/TEST/preupgrade/postupgrade_fixups.sql
Preupgrade complete:
We need to examine the content of preupgrade.log and take action according to it. Some of the action can be manual like increasing memory, processes, etc and other incorporated into the “preupgrade_fixups.sql”.
We can run the pre-upgrade fixup script as
sqlplus / as sysdba
@/u01/app/oracle/cfgtoollogs/db11g/preupgrade/preupgrade_fixups.sql
exit;
(11) Recovery options.
We need to decide about the recovery options in case of failure. We should enable the Archive log and then either take full RMAN backup or if possible create the guaranteed restore point by enabling Flashback
How to enable archive log mode in Oracle
SQL> Shutdown immediate
SQL>Startup mount
SQL>Alter database archivelog;
SQL> Alter database Open;
Verify Using
SQL> ARCHIVE LOG LIST
How to enable flashback and create a restore point
SQL> Shutdown immediate
SQL>Startup mount
SQL>Alter database flashback on;
SQL> Alter database Open;
Verify Using
SQL> select flashback_on from v$database;

SQL>create restore point BEF_UPG guarantee flashback database;
Once all these pre-upgrade are completed. we can move the 19c upgrade.
19c Database Upgrade
Source the new oracle home
cd $19c_Oracle_HOME/bin
./dbua

Check the database to be upgraded, put the sys username and password, and click Next
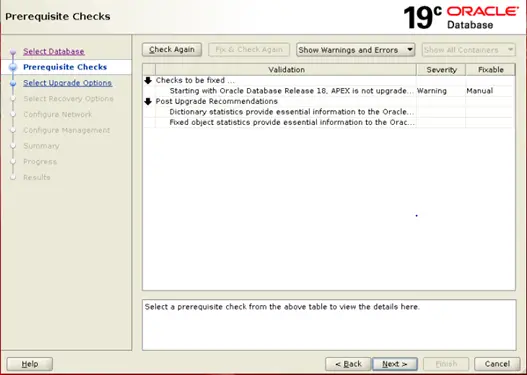
Address the pre-upgrade warning if have and then click next
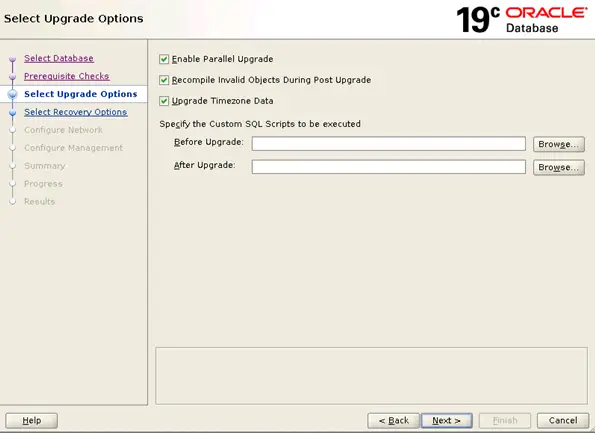
Choose the option of Enable parallel upgrade, compile invalid and upgrade timezone data and then click next
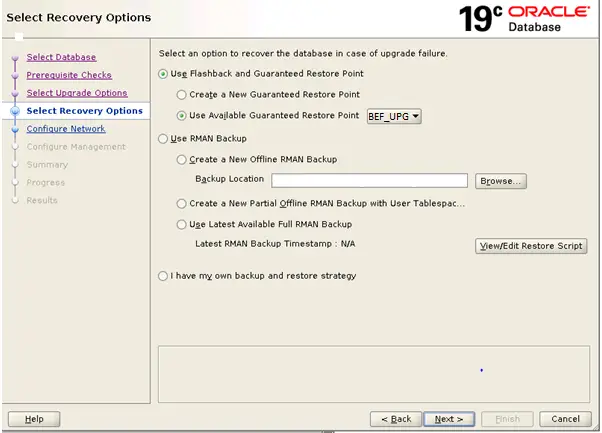
We enable the flashback before starting the upgrade and created the Guaranteed restore point BEF_UPG, So we choose just that in Recovery options and click next

We can choose to upgrade the listener and create a new listener. We are just ignoring here
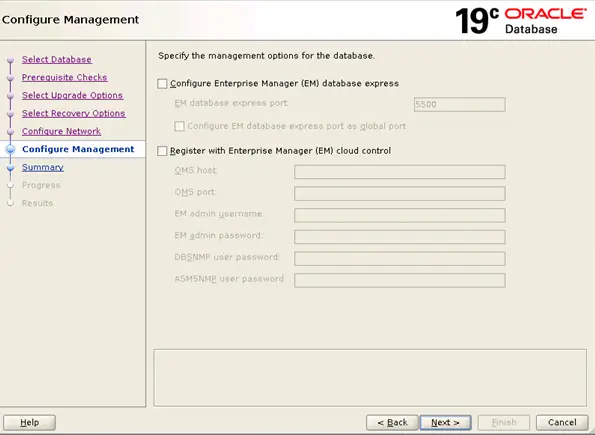
Ignoring these and click next
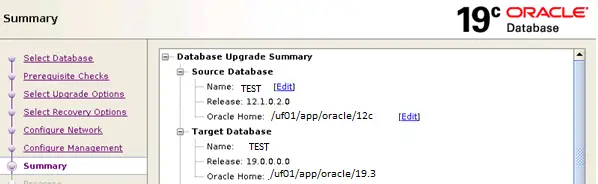
Check the detail and click on Upgrade
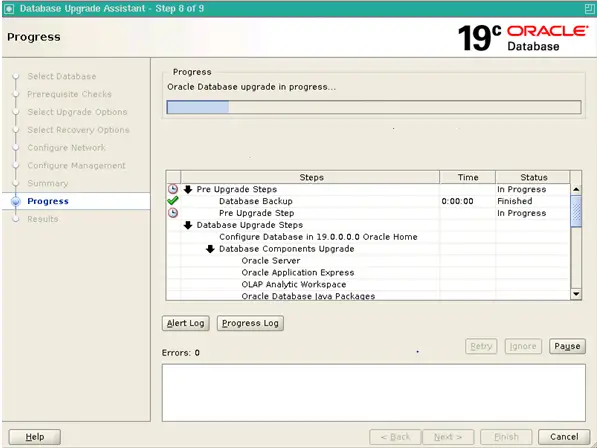
The upgrade will be finished
PostUpgrade Checks
(1) Compile the Invalid’s
SQL> @?/rdbms/admin/utlrp.sql
(2) Gather system and dictionary statistics
EXECUTE DBMS_STATS.GATHER_DICTIONARY_STATS
EXECUTE DBMS_STATS.GATHER_FIXED_OBJECTS_STATS;
(3) Run the post-upgrade fixup scripts
sqlplus / as sysdba
@/uf01/app/oracle/cfgtoollogs/TEST/preupgrade/postupgrade_fixups.sql
(4) Execute dbupgdiag.sql script to verify the status of objects and components.
cd <location of the script>
$ sqlplus / as sysdba
sql> alter session set nls_language='American';
sql> @dbupgdiag.sql
sql> exit
(5) Ensure that all database components/objects are upgraded and valid
Here is the script to check for components status
set pagesize 500
set linesize 300
col COMP_NAME format a40;
select substr(comp_name,1,40) comp_name, status, substr(version,1,10) version from dba_registry order by comp_name;
Here is the script to check for invalid object status before the upgrade
col OBJECT_NAME format a30;
col OWNER format a20
select substr(object_name,1,40) object_name,substr(owner,1,15) owner,object_type
from dba_objects where status='INVALID' order by owner,object_type;
(6) Check the timezone data
SQL> select version from v$timezone_file;
This finished the upgrade process. I hope you like this content