- EBS has traditionally signed desktop JARs with a private key for which a code signing certificate has been acquired. The private key, the signed certificate and its chain were stored in a Java Keystore file (JKS) on the application tier. Code Signing Certificate can be either from a commercial CA or from an in-house, private CA.
- The benefit of using a certificate from Commercial CA is that the Java 8 JRE on the desktop by default will trust the commercial CA’s root certificate. If using a certificate from a private CA, the root certificate of that private CA must be added as a trusted certificate in the truststore of the desktop JRE.
- Starting June 2023, the commercial CAs changed their policy and stopped issuing code signing certificates where your private key was kept in a disk file such as the Java KeyStore (JKS) file used by EBS JAR signing tools. In short, the private key used for code signing now needs to be kept in a Hardware Security Module.
- As an Oracle E-Business Suite customer, your choices for JAR signing are now either (a) or (b) below:
(a)Use a private CA-issued code signing certificate and keep using existing AD tools.
(b) Use a commercial CA-issued code signing certificate, and implement a custom signing process that satisfies the commercial CA’s requirements.
- Oracle has introduced a new setup of patches and a new process to make it simpler starting Aug 2024
- We will see the new process with Private CA and the Old Process with Private CA in this document
Old Process For Jar Signing using Private CA
(1) Apply the below patches to the EBS Instance
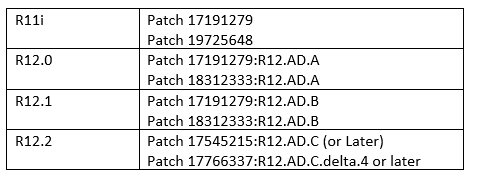
(2) Generate Keypair and Certificate Signing Request
Important Definition
adkeystore.dat - the keystore file that is used to sign jar files on the server.
adsign.txt - Used to pass arguments to the JRI during file signing. The first value within this file is your alias.
adkeystore.bak - a back up copy of your previous adkeystore.dat keystore taken before the new one is created.
JavaVersionFile - A reference file showing the Java version used in compilation The JDK version on your server)
The location of the adkeystore.dat is as below
11i/R12/0/R12.1 :JRI_DATA_LOC=$APPL_TOP/admin
R12.2: JRI_DATA_LOC=$NE_BASE/EBSapps/appl/ad/admin
Generate Keypair
adjkey -initialize [ -keysize < 2048 | 3072 | 4096 > ] [ -alias ]
Valid options for the -keysize parameter are 2048, 3072 or 4096
If you do not include the -keysize parameter it will use the default 2048 bit key size.
If you do not include the alias parameter it will be created using the environments $CONTEXT_NAME by default.

Example
$ adjkey -initialize -keysize 2048 -alias TECHGO

  Enter the APPS username: <appsusername>
  Enter the APPS password: <appspassword>

Enter the COMMON NAME [ ] : TECHGO

Enter the ORGANIZATION NAME [Atoz Widgets Ltd] : TECHGO

Enter the ORGANIZATION UNIT [ ] : <Your org unit>

Enter the LOCALITY (or City) [ ] : <Your city>

Enter the STATE (or Province or County) [ ] : <Your state, province or county>

Enter the COUNTRY (two-letter ISO abbreviation) [ ] :<Your country abbreviation>
Command to Create a Certificate Signing Request
$ keytool -sigalg SHA256withRSA -certreq -keystore /adkeystore.dat -file /adkeystore.csr -alias
Submit your Certificate Signing Request to Private CA
Submit your certificate signing request ‘adkeystore.csr’ to your official Private CA
(3) Import the Certificate
Once you receive the signed certificate from the Private CA, you need to perform the below steps
Upload the root certificate in the cacerts file
The location of the cacerts file is given as
11i: SEC_PROP_LOC= $OA_JRE_TOP/lib/security/
R12: SEC_PROP_LOC= $OA_JRE_TOP/jre/lib/security/
Copy the root certs to the directory SEC_PROP_LOC and then import the root cert
$cd $SEC_PROP_LOC
$ chmod +w cacerts
$keytool -import -alias  <root cert alias> -file  <root cert file name> -trustcacerts -v -keystore cacerts
$chmod a-w cacerts
Copy and Rename the ‘Code Signing Certificate’
cp code_signing_certificate.crt $JRI_DATA_LOC/adkeystore.crt
Import your Intermediate Certificate(s) (if required)
If you have any intermediate certificates in your chain of trust, import them into the Keystore adkeystore.dat using an alias of your choice that is different from the one used when creating your key pair
$ cd $JRI_DATA_LOC
$ keytool -import -file <intermediate.crt> -trustcacerts -alias <intermediate_alias_name> -keystore adkeystore.dat
Import the Java Code Signing Certificate
Import your ‘Java Code Signing Certificate’ into the keystore, adkeystore.dat . When importing this certificate you must use the same alias name that was used when creating your key pair
$ cd $JRI_DATA_LOC
$ keytool -import -file adkeystore.crt -trustcacerts -alias <alias_name> -keystore adkeystore.dat
(4) Regenerate the Jar files using adadmin
New Process For Jar Signing using Private CA
(1) Apply these patches to the EBS
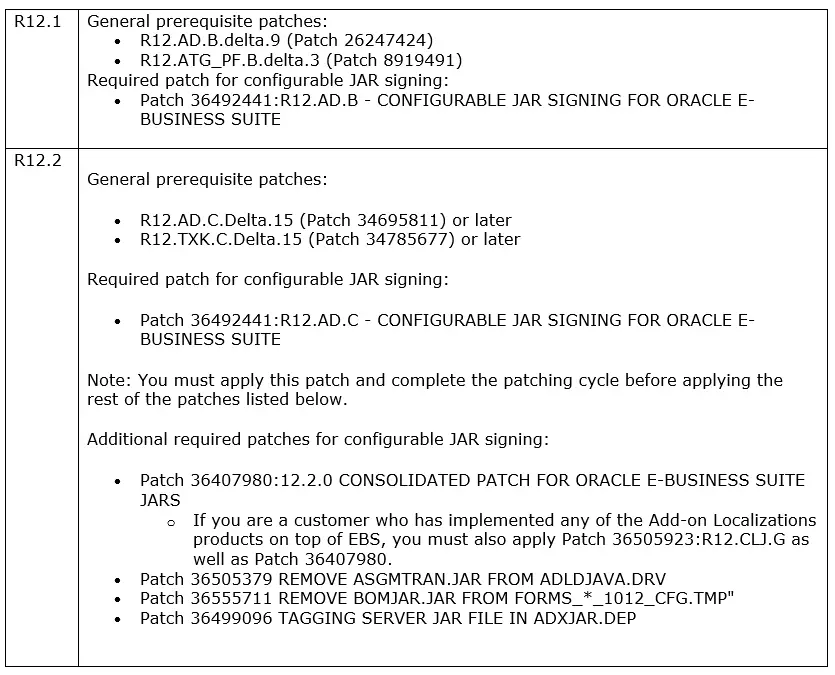
(2) Installation of the above patches introduces the following significant changes
- The adjkey utility is replaced with the new adjss utility.
- For EBS Release 12.2, the number of JAR files that are signed is reduced from over 300 files to 87.
- If a customall.jar exists, it will be written to a separate customjarlist.txt rather than replacing jarlist.txt.
- Java’s keytool command is used to create the keystore with the code signing certificate when using a private CA.
With the new adjss utility, the signing mode can be set to one of the following three values:
KEYSTORE - Sign using local disk based keystore file, use the keytool command to create the keystore file.
NONE - AD will not sign JARs. AD will produce jarlist.txt and optionally customjarlist.txt.
CUSTOM - Same as NONE, but AD will call a new customjarsign.sh script that has your own signing implementation.
The KEYSTORE mode can only be used with a private certificate authority. If you are using a new commercial certificate authority, either NONE or CUSTOM mode must be specified. If you are currently using a Hardware Security Module (HSM) for signing, you can run adjss to set the signing mode to NONE.
(3)Generate a keystore file with keypair and certificate distinguished name.
(i) Decide about the location of the Keystore file
(ii)Set these environment variables
KS=ebsjarsign.p12 # name of the keystore file
AL=ebsjarsign # name ("alias") of the keystore PrivateKeyEntry
ST=pkcs12 # keystore type (pksc12 avoids annoying keytool warnings)
export SP="secret123" # keystore password
export KP="${SP}" # key password
O="TECHGO" # your company name
CN="O Private JAR Signing J1" # your certificate name
C="US" # your ISO country code
(iii) Generate the private key pair
$ keytool -genkeypair -keystore "$KS" -alias "$AL" \
-storetype $ST -keyalg RSA -keysize 2048 \
-dname "CN=$CN, O=$O, C=$C" \
-storepass:env SP
(iv) create the CSR request
$ keytool -certreq -keystore "$KS" \
-alias "$AL" -file $AL.csr \
-storepass:env SP
(4) Get the csr files signed by your Private CA
(5) Import the certs
The number of files and names of the received certificate files are determined by your private CA.
The example below assumes you received the following aptly named certificate files: privateCAroot.crt, privateCAchain.crt, and ebsjarsign.crt.
First, add the root CA certificate as a trustedCertEntry in the Keystore:
$ keytool -importcert -keystore "$KS" -alias privateca \
-file privateCAroot.crt -storepass:env SP
Combine the code signing certificate and its intermediate chain certificates (the identity) into a single file:
$ cat privateCAchain.crt ebsjarsign.crt > ebsjarsign.pems
Now add this file as the trusted identity for your PrivateKeyEntry:
$ keytool -importcert -keystore "$KS" -alias "$AL" \
-file ebsjarsign.pems -storepass:env SP
Verification of the Keystore
$ keytool -list -keystore "$KS" -storepass:env SP
Keystore type: JKS
Keystore provider: SUN

Your keystore contains 2 entries

ebsjarsign, Feb 20, 2024, PrivateKeyEntry,
Certificate fingerprint (SHA-256): 1E:56:EF:DA:84:73:38:91:6F:D4:88:4E:31:...A5:82:29:B4
privateca, Feb 20, 2024, trustedCertEntry,
Certificate fingerprint (SHA-256): 8F:E2:EB:CC:23:78:48:4F:62:87:08:75:C3:...E2:4B:1B:A9
Check the certificate chain for the PrivateKeyEntry:
$ keytool -list -keystore "$KS" -alias "$AL" \
-storepass:env SP  -v | egrep 'Owner|Issuer:' | sed 's/^O/ O/'
 Owner: CN=Example Private JAR Signing J1, O=Example, C=US
Issuer: CN=Example Private CA J1, O=Example, C=US
 Owner: CN=Example Private CA J1, O=Example, C=US
Issuer: CN=Example Private CA J1, O=Example, C=US
(6) Register Your Code Signing Keystore with AD
For the signing to work, you must register the information about your keystore so the AD signing code can access it. You do that by running the adjss utility:
$ echo $SP $KP
$ adjss -mode KEYSTORE -keystore "$PWD/$KS" -alias "$AL" -sigfile CUST
adjss will prompt for the storepass ($SP) and keypass ($KP) and store them in the database. To do that, it will also prompt for the APPS password.
The server side of the JAR signing setup is now complete.
You can view and verify the proper setup of the signing mode by using the -list and -verify options of adjss.
For example:
$ adjss -verify
SIGNING MODE : KEYSTORE
Enter APPS password:
keystore file : /home/oracle/techgo/ebsjarsign.jks
keystore alias : ebsjarsign
keystore password : stored in database
keystore key password : stored in database
jarsigner sigfile : CUST
(4) Regenerate the Jar files using adadmin
Import the RootCA into the Java on the Client
Whatever method you follow from above, you will need to import the root cert of Private CA into the Java client
Download your CA root certificate for example, <root>.crt to the desktop and then follow the instructions for your desktop operating system.
- Open the ‘Java Control Panel’ on your desktop and select the ‘Security’ (tab).
- Click Manage Certificates to open the ‘Certificates’ Window
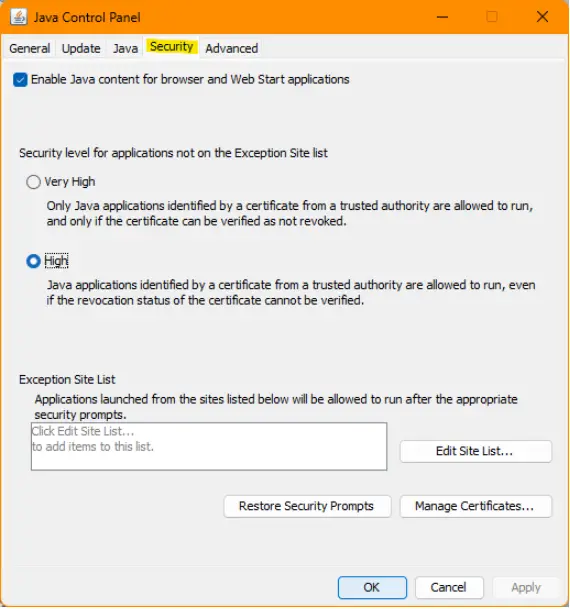
3. Choose Certificate type: Signer CA
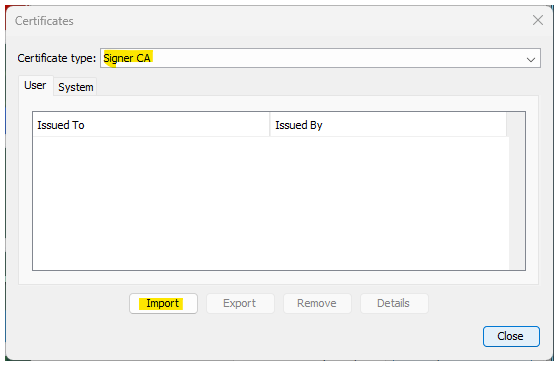
4. Click Import and upload the <root>.crt from your desktop
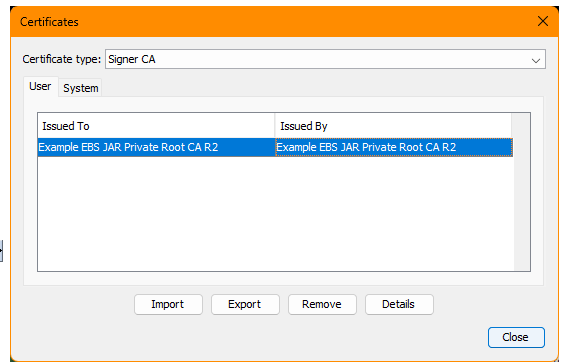
5. Close the ‘Certificates’ window and the ‘Java Control Panel’. The certificate should now be installed in the Java ‘Signer CA’ store.
I hope this document helps in Jar’s signing implementation
Related Articles
Signing JAR Files for Oracle E-Business Suite (Prior to August 2024) (Doc ID 3015098.1)
Signing JAR Files for Oracle E-Business Suite Release 12 (Doc ID 1591073.1)
How to Create a Minimally Viable Private CA for Jar Signing using OpenSSL
EBS Jar signing with HSM Based Certificate
How to verify the Digital Signature of a Signed jar File
keytool command