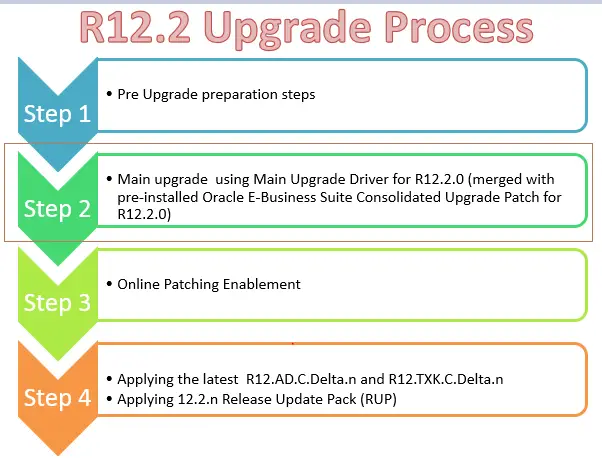
R12.2 Upgrade consists of following part
- Pre Upgrade preparation steps
- Main upgrade using Main Upgrade Driver for R12.2.0 (merged with pre-installed Oracle E-Business Suite Consolidated Upgrade Patch for R12.2.0)
- Online Patching Enablement
- Applying the latest R12.AD.C.Delta.n and R12.TXK.C.Delta.n
- Applying 12.2.n Release Update Pack (RUP)
We have already taken care of part 1 in previous Post
We are publishing the step 2(Main Upgrade Driver for R12.2.0) in this part
Step by step upgrade process for R12.2 Upgrade Part -1
Step by step upgrade process to R12.2 Upgrade part -2
Step by step upgrade process to R12.2 Upgrade part -3
Step by step upgrade process for R12.2 Upgrade Part -4

Main upgrade using Main Upgrade Driver for R12.2.0 (merged with pre-installed Oracle E-Business Suite Consolidated Upgrade Patch for R12.2.0)
(1) Set init ora parameter and Disabling Archive log
(a) cd $ORACLE_HOME/dbs
Take backup of pfile & spfile

(b)sqlplus “/ as sysdba”
 create pfile from spfile;

(c) Change/add Below Parameters in pfile.
 *._sqlexec_progression_cost = 2147483647 #MP
 *._optimizer_autostats_job=false #MP
 *.aq_tm_processes=1
 *.log_checkpoint_interval=100000
 *.job_queue_processes=No of CPU Core( This will help in invalid object compilation)
 *.parallel_max_servers=2X No of CPU Core  ( This will help in large index rebuild)
 *.max_dump_file_size='102400'
 *.O7_DICTIONARY_ACCESSIBILITY=FALSE
 *.recyclebin=OFF
 *.cluster_database=false ( If it is RAC database)

 Set the below parameter to have fixed memory areas during the upgrade process

unset (remove) - sga_max_size
sga_target=0
db_cache_size=< Maximum depending on Memory available>
shared_pool_reserved_size=10% of shared pool size
shared_pool_size =< Maximum depending on Memory available>

(d)Shutdown and start database using modified pfile

sqlplus / as sysdba
shutdown immediate
startup pfile='initSID.ora'
create spfile from pfile
shutdown immediate
startup mount

(e)Disable archive log for the upgrade period
 alter database noarchivelog

(f)Disable force logging
 alter database no force logging
 alter database open;
 archive log list;

 We can increase the redo file size if they are small in size. Upgrade does lot of redo logs.,Big redo logs always help
(2) Set R12.2 run filesystem environment and Enable Maintenance Mode
(a) Source the applications run file system environment file as found in the fs1file system appl_top. (Make sure you don’t source the R12.1 OR the 11i environment). We should be running all the below steps on new run file system only
(b) Enable Maintenance mode using adadmin
sqlplus apps/apps @$AD_TOP/patch/115/sql/adsetmmd.sql ENABLE
(3) Apply the AD upgrade patch
- Download and unzip the AD Upgrade Patch for 12.2 (patch 10117518). Follow the instructions in the patch readme to use Adpatch to run it from the 12.2 Run File System.
- Important: AD Upgrade Patch for 12.2 (patch 10117518) patch readme contains information about the latest Consolidated Upgrade Patch (CUP) for AD. You must follow the patch 10117518 readme and apply it after merging with the latest AD Consolidated Upgrade Patch (CUP), as instructed in the readme.
(i) As per Readme file of Patch 10117518, it requires patch#30370733:R12.AD.C to be merged with it and apply in Entirety
So merging two patches using admergch
admrgpch -s /AD_source -d /10117518_merge -merge_name 10117518_merge -admode
(ii) Create $ORACLE_HOME/appsutil/admin on the database server.
(iii) Copy adgrants.sql from this patch 30370733 directory to $ORACLE_HOME/appsutil/admin.
(iv) Run the script:
$ sqlplus /nolog
SQL> @$ORACLE_HOME/appsutil/admin/adgrants.sql APPLSYS
Incase of CDB (19c)
Source the CDB environment
export ORACLE_PDB_SID=TEST
(v) Apply the merge AD patch (10117518_merge) using adpatch
(4) Apply CUP patches
- Apply the Consolidated Upgrade Patch (CUP) for Release 12.2.0 (Patch 30399970:12.2.0) in pre-installation mode on the Run Edition File System.
- Note: Before applying Patch 30399970:12.2.0 for the latest CUP in pre-installation mode:
- if you have applied any other patch previously in pre-installation mode and do not intend to merge it with 12.2.0 upgrade driver u10124646.drv, clean up the directory /admin//preinstall on run file system after taking the backup of the current directory.
$ adpatch preinstall=y
(5) Apply Other Important patches in Pre-install mode
- Refer to My Oracle Support Knowledge Document 1448102.2 for the Oracle E-Business Suite Release 12.2 Pre-install Patches Report;
- Download and install the latest version of the Oracle E-Business Suite Preinstall Patches Report zip file for your target release. The reports are updated about every other month to identify any new Oracle E-Business Suite preinstall patches that have been released since the previous version of the report.
- This report helps you determine what preinstall patches you should apply for a smooth Release 12.2 upgrade, in addition to the latest Release 12.2 CUP. Please review the guidelines in the Selection Recommendation section and download the resulting patches. Apply the patches in preinstall mode to the Release 12.2 file system that was installed using the Rapid Install wizard. Then merge the corresponding drivers with the Release 12.2 main upgrade driver. Then follow the instructions in the Release 12.2 upgrade guide to use the newly merged Release 12.2 upgrade driver to upgrade your instance to Release 12.2.
Selection Recommendation
- We strongly recommend that you apply all patches categorized under “Upgrade Script Failure” and “Performance Fix” at the Oracle E-Business Suite level. You can obtain the list of these patches by selecting “E Business Suite (EBS)” from the Product Family list of values and reviewing the sections “Upgrade Script failure – EBS” and “Performance issue – EBS”.
- We recommend that functional analysts review the patches categorized under “Data Corruption Fix” and “Upgrade Integrity Fix” and apply the patches in these categories for each product or functional area you have implemented within Oracle E-Business Suite. Choose the appropriate product family name in the “Product Family” list of values and review the patches listed under the sections “Upgrade Integrity Fix” and “Data Corruption” in the right frame.
(6) Apply Main Upgrade Driver for R12.2.0
(i) Merge the patch drivers in $APPL_TOP/admin/$TWO_TASK/preinstall directory with the 12.2.0 upgrade driver $AU_TOP/patch/115/driver/u10124646.drv
Attention: All of the patch driver files located under $APPL_TOP/admin//preinstall are merged with the 12.2.0 upgrade driver /patch/115/driver/u10124646.drv. Therefore, carefully evaluate the content of the directory – /admin//preinstall and retain only those patch drivers including u16595191.drv ; it is intended to be merged with 12.2.0 upgrade driver – u10124646.drv
(ii) Merging patch drivers in Run File System’s /admin//preinstall with /patch/115/driver/u10124646.drv:
cd $AU_TOP/patch/115/driver
admrgpch -d . -preinstall -master u10124646.drv
Default merged driver by name u_merged.drv would be created in the destination directory specified.
(iii) Apply the newly merged 12.2 upgrade driver using adpatch
adpatch options=nocopyportion,nogenerateportion
(7) Disable Maintenance mode
Use adadmin. To disable maintenance mode.
 *** Maintaining the File System (in Classic mode) ***
 *** Not Edition Enabled User ***
 AD Administration Main Menu
 Generate Applications Files menu
 Maintain Applications Files menu
 Compile/Reload Applications Database Entities menu
 Maintain Applications Database Entities menu
 Change Maintenance Mode
 Exit AD Administration
 Enter your choice [6] : 5
 Change Maintenance Mode
 Maintenance Mode is currently: [Enabled].
 Maintenance mode should normally be enabled when patching the Oracle E-Business Suite and disabled when users are logged on to the system. See the Oracle E-Business Suite Maintenance Utilities manual for more information about the maintenance mode.
 Please select an option:
 Enable Maintenance Mode
 Disable Maintenance Mode
 Return to the Main Menu
 Enter your choice [3] : 2
 sqlplus -s &un_apps/* @$AD_TOP//patch/115/sql/adsetmmd.sql DISABLE
 Successfully disabled Maintenance Mode
(8) Update the RDBMS ORACLE_HOME file system with AutoConfig and Clone files
(i) Source the applications run file system environment file as found in the fs1 file system appl_top.
Create appsutil.zip in $INST_TOP/admin/out by running perl $AD_TOP/bin/admkappsutil.pl
perl admkappsutil.pl
Starting the generation of appsutil.zip
Log file located at output located at
/admin/out/appsutil.zip
MakeAppsUtil completed successfully.
(ii) Copy the appsutil.zip file to the and unzip the file.
unzip -o appsutil.zip
(iii) Copy JRE to $ORACLE_HOME/appsutil from the database tier that comes along with the R12 filesystem
(9) Set and export the variable and create the new Context file for the database Tier
(i)In DB Tier:
Set the following variable
$ORACLE_HOME
$LD_LIBRARY_PATH
$ORACLE_SID
$PATH
$TNS_ADMIN
Make sure tnsnames.ora and listener.ora are existings and Listener is Up
(ii) Run adbldxml
cd $ORACLE_HOME/appsutil/bin
perl adbldxml.pl
Starting context file generation for db tier..
Using JVM from /uxyz/app/ora/TEST/db/11.2.0.4/appsutil/jre/bin/java to execute java programs..
The log file for this adbldxml session is located at:
/uxyz/app/ora/TEST/db/11.2.0.4/appsutil /log/adbldxml_68765876.log
Enter the value for Display Variable: tech:2.0
The context file has been created at:
/uxyz/app/ora/TEST/db/11.2.0.4/appsutil /TEST_tech.xml
(10) Run autoconfig on the database Tier
adconfig.sh contextfile=/uxyz/app/ora/TEST/db/11.2.0.4/appsutil /TEST_tech.xml
Enter the APPS user password:
The log file for this session is located at: /uxyz/app/ora/TEST/db/11.2.0.4/appsutil/log/TEST_tech/122869859/adconfig.log

AutoConfig is configuring the Database environment…

AutoConfig will consider the custom templates if present.
Using ORACLE_HOME location :/uxyz/app/ora/TEST/db/11.2.0.4
Classpath :
Using Context file : /uxyz/app/ora/TEST/db/11.2.0.4/appsutil/TEST_tech.xml
Context Value Management will now update the Context file
Updating Context file…COMPLETED
Attempting upload of Context file and templates to database…COMPLETED
Updating rdbms version in Context file to db111
Updating rdbms type in Context file to 64 bits
Configuring templates from ORACLE_HOME …
AutoConfig completed successfully.
(11) Prepare the run file system for Final configuration
- Drop table ADX_PRE_AUTOCONFIG from APPS schema.
- Prior to running Rapid Install to configure Release 12.2 E-Business Suite instance, check if table – ADX_PRE_AUTOCONFIG exists in APPS schema:
select object_name, object_type, owner, status from dba_objects where
upper(object_name)='ADX_PRE_AUTOCONFIG' and object_type='TABLE' and upper(owner)='APPS';
If it exists
- cd /patch/115/sql
- sqlplus APPS/
@txkDropAdxPreAutoConfig.sql
(12) Configure & Start Server Processes by running Rapid Install
- You must run the Rapid Install a second time to complete the configuration using the Run File System context file.
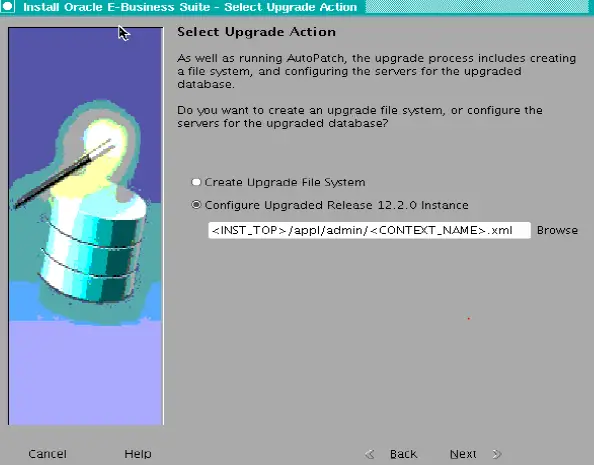
- In the Rapid Install wizard, select Upgrade to Oracle E-Business Suite Release 12.2.0 and then select the option of Configure Upgraded Release 12.2.0 Instance.

(13) Re-enable/Rebuild custom triggers and indexes
- Shutdown application services before you start rebuild the index.
- Re-enable the triggers you disabled at the start of upgrade
- Rebuild the indexes which you disabled at the start of the upgrade
For next steps. please refer below articles
Step by step upgrade process to R12.2 Upgrade part -3
Step by step upgrade process for R12.2 Upgrade Part -4
Related articles
Top AWR useful queries for R12.2/R12.1 Upgrade
40 question you must know about R12.2
How to clone R12.2 environment
Important Changes in Autoconfig R12.2