- In this post, I am going to post How to clone R12.2 environment which is the latest release Oracle E-business suite. Cloning is an essential part of the EBS environment. The organization needs a Development, test, and QA environment to test the patches, code changes, and new feature before moving into production. Cloning also needs to be done at regular intervals of time so that the Development and test environment are in sync with Production. It is an essential duty of APPS DBA to perform cloning without any issues and give the environment to the developer on time
- We have already discussed the cloning of the R12.1 environment in the below article
How to clone R12.1 Environment
Most of the part of R12.2 cloning is the same as R12.1 cloning but there are a few differences. Here are the important differences
- FMW_Home cloning is handled by weblogic utilities
- Adpreclone.pl creates a clone stage area of FMW_Home under common top using weblogic utils
- During clone, we don’t need to copy FMW_Home
- adcfgClone builds FMW_Home using the stage area via weblogic utilities
Now let’s move into steps for Cloning single-node and Multi-node environment
How to clone the R12.2 environment (single node)
For Oracle E-Business Suite Release 12.2 system that is on the AD-TXK Delta 6 or lower code-level
Step 1 Prepare the Source System database tier for cloning
1. Log on to the Source System as the Oracle user.
2. Source the Database tier environment file.
cd <RDBMS ORACLE_HOME>/appsutil/scripts/<CONTEXT_NAME>
perl adpreclone.pl dbTier
This will create a $ORACLE_HOME/appsutil/clone directory on the source database home
2. Prepare the Source System application tier for cloning
a.Log on to the primary node of the Source System as the applmgr user.
b.Source the environment file of the Run Edition File system.
You can use the following command to confirm that the environment variable FILE_EDITION points to the Run Edition File System:
$ echo $FILE_EDITION
It should return the value:
run
3.Execute the following commands:
cd <INST_TOP>/admin/scripts
$ perl adpreclone.pl appsTier
It may be tempting not to run this each time you clone from this env, but here are the reasons that will make you rethink your decision
(a) If you apply a new Rapid Clone or AutoConfig update to the system, you must execute adpreclone.pl again on the database tier and applications tier to apply the new files into the clone directory structures to be used during the cloning configuration stage.
(b) if you patch Oracle Fusion Middleware or make configuration changes to the Oracle E-Business Suite WebLogic Domain, you must execute adpreclone.pl again on the applications tier to rebuild the Oracle Fusion Middleware home.
The adpreclone.pl process on the application tier creates a complete compressed archive of the Oracle Fusion Middleware and its components as follows.
A compressed archive of the Oracle WebLogic Server home, Oracle Web Tier Utilities home, Oracle Common Utilities home, and the Oracle E-Business Suite home:
<COMMON_TOP>/clone/FMW/FMW_Home.jar
A compressed archive of the Oracle E-Business Suite WebLogic domain:
<COMMON_TOP>/clone/FMW/WLS/EBSdomain.jar
The Oracle E-Business Suite WebLogic domain’s configuration template:
<COMMON_TOP>/clone/FMW/WLS/plan/moveplan.xml
A compressed archive of the Oracle Web Tier/Oracle HTTP Server configuration instance:
<COMMON_TOP>/clone/FMW/OHS/ohsarchive.jar
The Oracle HTTP Server configuration instance’s configuration template:
<COMMON_TOP>/clone/FMW/OHS/moveplan.xml
The adpreclone log files are created in the <INST_TOP>/admin/log/clone directory.
These jar files created in the clone directory are sufficient to clone the FMW home, So we dont need to copy the FMW home in the cloning process from source to target
Step 2: Copy the Database Oracle home From the source to the target tier.
You can tar or cp command as per your convenience.
We need to make we check all the symlinks in the Oracle home on the target side and correct it
Step 3: Run adcfgclone
cd <RDBMS ORACLE_HOME>/appsutil/clone/bin
$ perl adcfgclone.pl dbTechstack
I am running here dbtechstack as i want to manage the database clone manually
This will relink the oracle home, create all the configuration files
Step 4: Clone Source database target database using RMAN or manual hotbackup and coldbackup whatever suite you.
Step 5:Configure the database
Once the database is Open
a.Run AutoConfig in the INSTE8_SETUP mode on the database tier as follows:
On UNIX:
sh <RDBMS_ORACLE_HOME>/appsutil/bin/adconfig.sh contextfile=<CONTEXT_FILE> run=INSTE8_SETUP
b. Run the library update script against the database.
$ cd <RDBMS ORACLE_HOME>/appsutil/install/<CONTEXT NAME>
$ sqlplus “/ as sysdba” @adupdlib.sql <libext>
Where <libext> should be set to sl for HP-UX, so for any other UNIX platform, or dll for Windows.
c. Configure the Target database.
The database must be running and open before performing this step.
cd <RDBMS ORACLE_HOME>/appsutil/clone/bin
$ perl adcfgclone.pl dbconfig <Database Target Context File>
Where "Database Target Context File" is: <RDBMS ORACLE_HOME>/appsutil/<Target CONTEXT_NAME>.xml
Note: The dbconfig option will configure the database with the required settings for the new Target, but it will not recreate the control files.
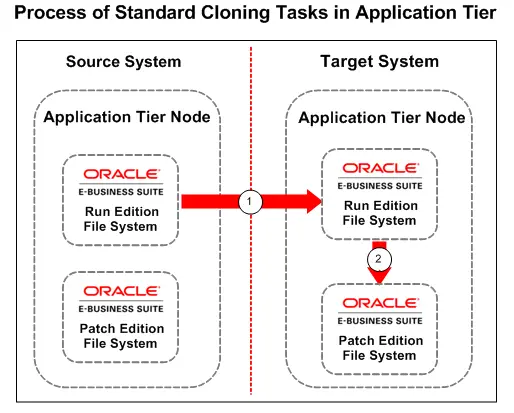
Step 6: Copy the application tier file system from the Source “Run Edition File System” to the Target “Run Edition File System” and Configure it
Only these files need to be copied. Make sure you pay attention to symbolic links under <OracleAS Tools 10.1.2 ORACLE_HOME> and <COMMON_TOP> directories when copying files.
<APPL_TOP>
<COMMON_TOP>
<OracleAS Tools 10.1.2 ORACLE_HOME>
the structure should be like this
mkdir -p /u86/vis122/fs1/
mkdir -p /u86/vis122/fs2/
mkdir -p /u86/vis122/fs_ne/
Run
$ cd <COMMON_TOP>/clone/bin
$ perl adcfgclone.pl appsTier
At the prompt "Target System Base Directory", enter the location of the base directory. For example: /u86/vis122.
When asked the question:
Do you want to startup the Application Services for mult35? (y/n)” you should answer ‘n’.
The log files are created in the <INST_TOP>/admin/log/clone directory in the Run Edition File System
Step 7 Copy the following Oracle E-Business Suite application directories from the Run Edition File System to the Patch Edition File System.
<APPL_TOP>
<COMMON_TOP>
<OracleAS Tools 10.1.2 ORACLE_HOME>
Log on to the Patch Edition File System in the Target System as the applmgr user and enter the following commands:
$ cd <COMMON_TOP>/clone/bin
$ perl adcfgclone.pl appsTier
The Patch Edition File System must be aware of the location of the Run Edition File System that will be configured in the next step. At the prompt “Location of Run System Context File”, enter the absolute path to the context file for the Run Edition File System that was created in the previous step.
For example: /u86/vis122/fs1/inst/apps/TEST_<servername>/appl/admin/TEST_<servername>.xml.
The log files are created in the <INST_TOP>/admin/log/clone directory in the Patch Edition File System.
Step 8 You can start the services from run file system
For Oracle E-Business Suite Release 12.2 system that is on AD-TXK Delta 7 codelevel.
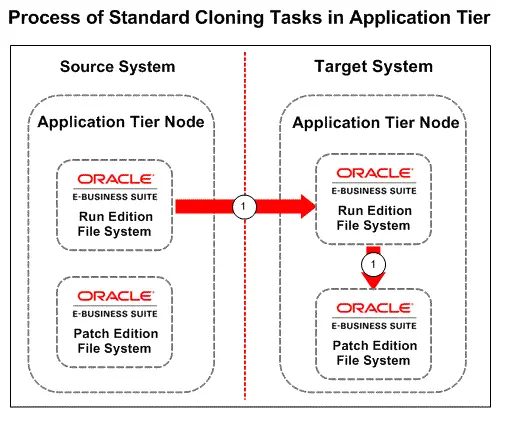
All the above steps 1-5 remains same. Step 6 and step 7 are merge as
Copy the application tier file system from the Source “Run Edition File System” to the Target “Run Edition File System”
Only these files need to be copied. Make sure you pay attention to symbolic links under <OracleAS Tools 10.1.2 ORACLE_HOME> and <COMMON_TOP> directories when copying files.
<APPL_TOP>
<COMMON_TOP>
<OracleAS Tools 10.1.2 ORACLE_HOME>
the structure should be like this
mkdir -p /u86/vis122/fs1/
mkdir -p /u86/vis122/fs2/
mkdir -p /u86/vis122/fs_ne/
Make sure fs_ne and patch file system should be empty before starting the cloning.
Run
$ cd <COMMON_TOP>/clone/bin
$ perl adcfgclone.pl appsTier dualfs
This command will configure both the run and patch filesystem on target system
Now after you can start services from run filesytem
How to clone to Multi Tier environment
For Oracle E-Business Suite Release 12.2 system that is on the AD-TXK Delta 6 or lower codelevel
Step 1: Clone the database tier node.
Step 2: Clone the primary application tier node from the Source Run Edition File System to the Target Run Edition File System.
Step 3:Clone the primary application tier node from the Target Run Edition File System to the Target Patch Edition File System.
Step 4: Add further application nodes to the secondary application tier Run Edition File System by cloning the primary application tier node from the Target Run Edition File System to the secondary application tier node in the Target Run Edition File System.
Before executing these steps, ensure the AdminServer on both the Run Edition File System and the Patch Edition File System is running. This is required for adcfgclone.pl to properly re- register the new node on the Target System.
step 5: Add additional application tier nodes in the secondary application tier node Patch Edition File System by cloning the primary application tier node from the Target Patch Edition File System to the secondary application tier node in the Target Patch Edition File System.
For Oracle E-Business Suite Release 12.2 system that is on AD-TXK Delta 7 codelevel.
Step 1: Clone the database tier node.
Step 2: Clone the primary application tier node from the Source Run Edition File System to the Target Run Edition File System using the ‘dualfs’ option.
Step 3: Add further application nodes to the secondary application tier Run Edition File System by cloning the primary application tier node from the Target Run Edition File System to the secondary application tier node in the Target Run Edition File System using the ‘dualfs’ option.
Articles you must read on R12.2
Login flow and basic troubleshooting for R12.2
Service Group changes in R12.2
adopmon and adopreports utility R12.2.5
R12.2 Online patching cycle Summary
Isolating post-upgrade concurrent programs to a separate manager queue in R12.2
R12.2 RapidWiz Installed Components and System Requirements
Top AWR useful queries for R12.2/R12.1 Upgrade
How to rollback the patch after failed cutover phase in R12.2
forward cross edition triggers R12.2
40 question you must know about R12.2
Useful Unix lesson every DBA must know
Practical Unix commands with example
Top awk command every DBA must know
All about sed command in unix
RSYNC – sync the data between two directory
split ,tr and tee unix command with examples
Bg, Fg, &, Ctrl-Z Unix command to Manage Unix Background Jobs with Examples
PuTTY CONNECTION MANAGER (PuttyCM)
Advanced shell scripting technique