Oracle Virtual box VM will not be started if Virtualization Technology (VT-x) is not enabled in BIOS.
It will throw the below error while starting the VM
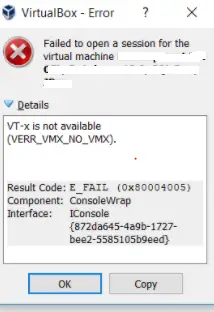
Reason for the Error
The host system must support hardware virtualization. Your host system must have 64-bit CPUs that support Intel™ Virtualization Technology (Intel VT, first released in 2005) or AMD Virtualization (AMD-V™) Technology (first released in 2006) hardware-virtualization features.
Most new CPUs from Intel and AMD contain the required virtualization extensions. These virtualization extensions are not normally enabled by default in a new machine. It is necessary to enter BIOS in your system and enable virtualization extensions before attempting to run any virtual machines.
Solution
Please follow the below steps to enable
- Power ON the System.
- Enter the BIOS setup by pressing the ‘F2’ or ‘Del’ or ‘Enter’ keys (The key may vary depending on your System Model, please follow the on-screen instructions during Power ON).
- Look for an option labelled by ‘Virtualization Technology’ or ‘Intel® Virtualization Technology’ under the ‘CPU Configurations’, ‘System Configurations’, ‘Advanced’ or ‘Security’ tab and check if the option is enabled or disabled.
- If the option is disabled, enable the same.
- Save the BIOS settings and Boot into Windows by pressing ‘F10’ key (The key may vary depending on your System Model).
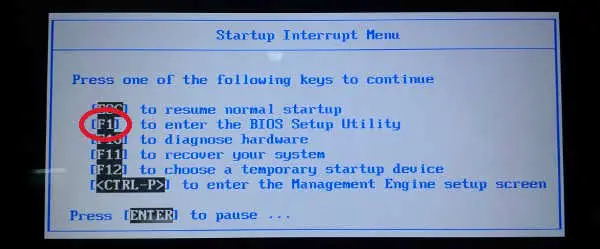
Screenshot and Steps for Lenovo Thinkpad Windows 10
- power on the system and press enter while the Thinkpad screen comes

2) Press F11 to enter the BIOS
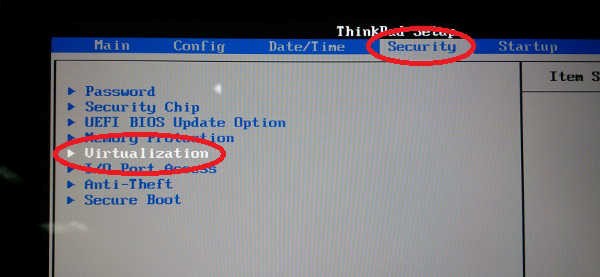
3) Navigate to the Security tab using the arrow keys and then press Enter on Virtualization.
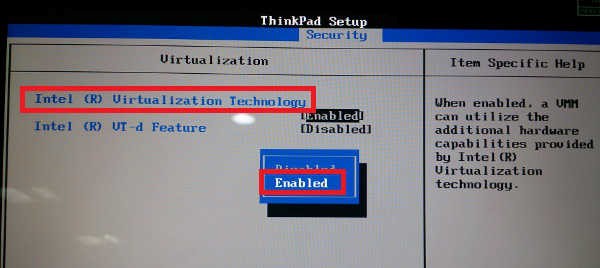
4) Select “Intel(R) Virtualization Technology” Press Enter, choose Enable and press Enter
5) Press F10.
6)Press Enter on YES to save the settings and boot into Windows.

7) This should start your system with Virtualization enabled and Virtual Box should successfully create the VM
How to delete Virtual Machine from Oracle VirtualBox
Step by Step instructions for Oracle Virtual Box Installation