We can have both Linux and Windows compute instances in the Oracle Cloud. Let’s learn about how to login to both the Linux and Window compute instance/how to access oracle cloud compute instance
Linux Compute Instance
We first need to make sure, we have the public IP associated with the Compute instance and security list allowed to connect to the SSH port 22 on that instance
We have two ways to connect to the Linux Compute instance
a. SSH from Window client
b. SSH from a Linux-like client
SSH from window Client
- First, create the Linux Compute instance and then allow SSH access to the Compute instance from the Internet
- Now generate the SSH key pair using puttygen. Read the below article for a generation
how to generate ssh key pair from puttygen.
The important thing to note: We should copy the public key generated and don’t use the save public key button
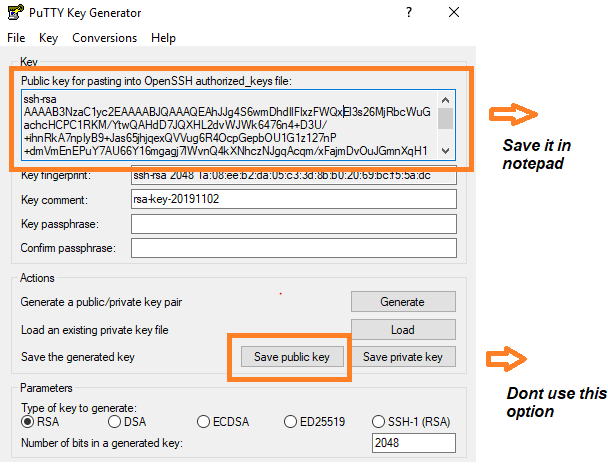
Now we can use that ssh key pair to log in to Compute instance with the putty client
3. Now login to the Oracle cloud service
i. you can go to https://cloud.oracle.com, click Sign In, and select the Public Cloud Services value for your region from the My Services – Select Data Center dropdown list. Either way, you must provide an identity domain, user name, and password to sign in.
ii. Identify your service and click on it
iii. Make a note of the public IP address for the server
iv. Add the public key submit and put the public key obtained in the above steps
or if you are creating a new compute instance, we can supply the same public key at the same time
4. Now let’s see How to login to Linux with SSH private key from the Windows client
Step 1
Run the PuTTY program.

Step 2
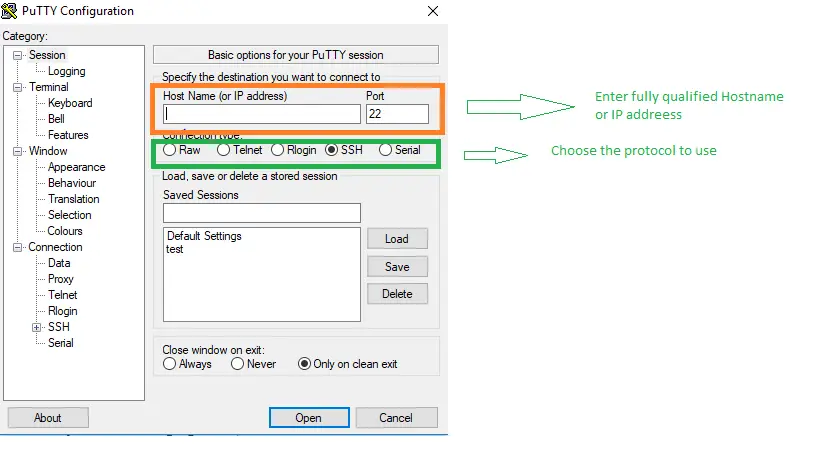
The PuTTY Configuration window is displayed, showing the Session panel.
- Enter the public IP address of your compute instance in the Host Name (or IP address) box,
- Make sure that the Connection type option is set to SSH.
Step 3
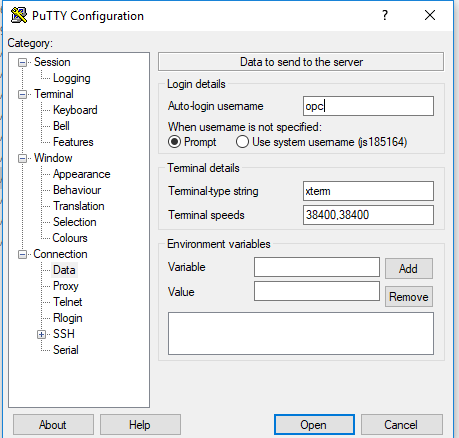
In the Category tree, expand Connection and click Data.
The Data panel is displayed.
In the Auto-login username box, enter the username “OPC“
Step 4
In the Category tree, expand SSH and then click Auth.
The Auth panel is displayed.
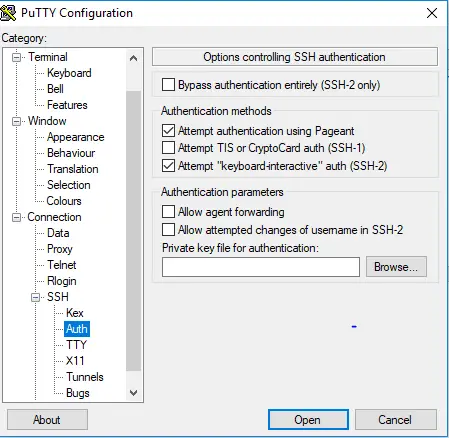
Click the Browse button next to the Private key file for the authentication box. Navigate to and open the private key file that matches the public key that is associated with your instance.
Step 5
In the Category tree, click Session.
The Session panel is displayed.
In the Saved Sessions box, enter a name for this connection configuration and click Save.
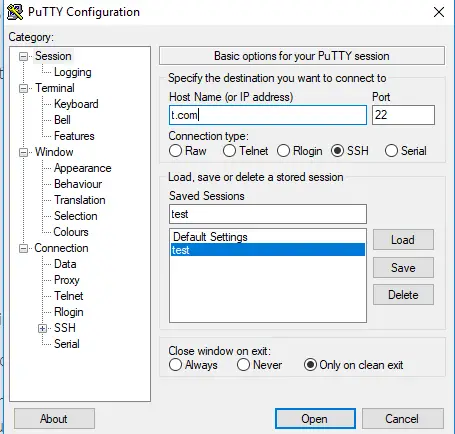
Step 6
Click Open to open the connection.
The PuTTY Configuration window is closed and the PuTTY window is displayed.
Step 7
If this is the first time you are connecting to an instance, the PuTTY Security Alert window is displayed, prompting you to confirm the public key. Click Yes to continue connecting.
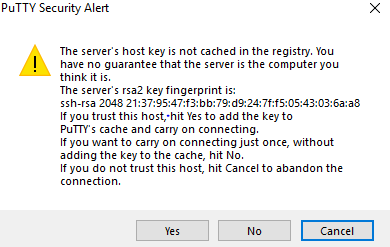
Step 9
A terminal window will open.
SSH from Linux Type Client
if You plan to connect it through a Linux instance, then generate the keys through ssh-gen
How to generate ssh key pair on Unix using ssh-keygen
Then again copy the public generated in Oracle compute instance. Now connect to Oracle Linux compute instance
ssh opc@ip_address —i private_key
Window Compute Instance
We first need to make sure, we have the public IP associated with the Compute instance and security list allowed to RDP connection on that instance
To enable RDP access
- Open the navigation menu. Under Core Infrastructure, go to Networking and
click Virtual Cloud Networks.
- Click the cloud network you’re interested in.
- Click Security Lists, and then click the security list you’re interested in.
- Click Edit All Rules.
- Under Allow Rules for Ingress, click Add Rule.
- Enter the following for your new rule:
- Source Type: CIDR
- Source CIDR: 0.0.0.0/0
- IP Protocol: RDP (TCP/3389)
- Source Port Range: All
- Destination Port Range: 3389
- When done, click Save Security List Rules.
Now Connecting to Your Windows Instance from a Remote Desktop Client
1. Open the Remote Desktop client.
2. In the Computer field, enter the public IP address of the instance you want to connect to. Your public IP is the instance address you get from the Console.
3. The User’s name is OPC. Depending on the Remote Desktop client you are using, you might have to connect to the instance before you can enter this credential.
4. Click Connect to start the session.
5. Accept the certificate if you are prompted to do so.
6. If you are connecting to the instance for the first time, enter the initial password that was provided to you by Oracle Cloud Infrastructure when you launched the instance. You will be prompted to change the password as soon as you log in. Your new password must be at least 12 characters long and must comply with Microsoft’s password policy. Otherwise, enter the password you created. If you are using a custom image, you may need to know the password for the instance the image was created from.
7. Press Enter.
Hope you like this post on how to access oracle cloud compute instance (Linux/Windows). Please do provide the feedback
Related Articles
SSH Putty commands
How to Setup ssh passwordless login using SSH keygen between two servers
How to install SSH on Ubuntu
Oracle Cloud :Infrastructure-as-a-Service Concepts
Identity domain Concept in Oracle Cloud