This post I will explaining my experience with setting up DMZ for EBS R12. We will first go through some of the important terms
DMZ
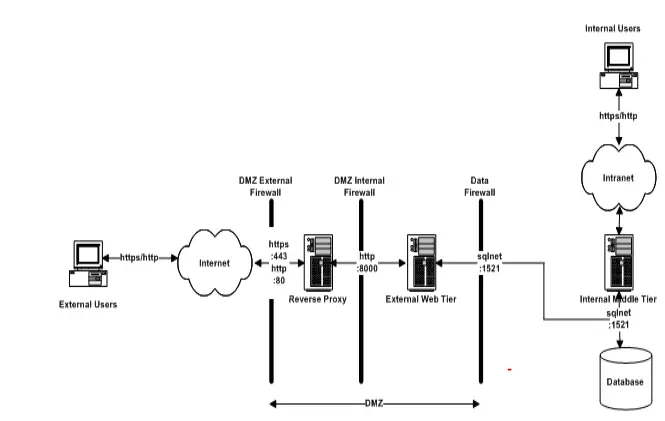
The DMZ, which stands for Demilitarized Zone consists of the portions of a corporate network that are between the corporate intranet and the Internet. The DMZ can be a simple one segment LAN or it can be broken down into multiple regions. The main benefit of a properly configured
DMZ is better security: in the event of a security breach, only the area contained within the DMZ is exposed to potential damage, while the corporate intranet remains somewhat protected
Load Balancer
Load balancers distribute an application’s load over many identically configured servers. This distribution ensures consistent application availability even when one or more servers fail.
Reverse Proxy
A reverse proxy server is an intermediate server that sits between a client and the actual web server and makes requests to the web server on behalf of the client. You can find more information on reverse proxy servers
Internal Applications Middle Tier
The internal applications middle tier is the server configured for internal users to access Oracle E-Business Suite. It runs the following major application services:
Web and Forms Services
Administration and Concurrent Manager Services
Reports and Discoverer Services
External Applications Web Tier
The external applications web tier is the server configured for external users for accessing Oracle EBusiness Suite. It runs the following application service:
Web server
How to create DMZ for EBS R12
(1) Create the External Web Tier With Reverse Proxy
Case A: A New server with Reverse Proxy

Clone Application Tier to the New server
- Run adpreclone and Take backup of the Internal Web Tier
- Restore on External Web Tier
- Run adcfgclone appsTier and configure the external Node
Once this is completed, Change following in the context file
<TIER_DB oa_var="s_isDB">NO</TIER_DB>
<TIER_ADMIN oa_var="s_isAdmin">NO</TIER_ADMIN>
<TIER_WEB oa_var="s_isWeb">YES</TIER_WEB>
<TIER_FORMS oa_var="s_isForms">NO</TIER_FORMS>
<TIER_NODE oa_var="s_isConc">NO</TIER_NODE>
<TIER_FORMSDEV oa_var="s_isFormsDev">NO</TIER_FORMSDEV>
<TIER_NODEDEV oa_var="s_isConcDev">NO</TIER_NODEDEV>
<TIER_WEBDEV oa_var="s_isWebDev">YES</TIER_WEBDEV>
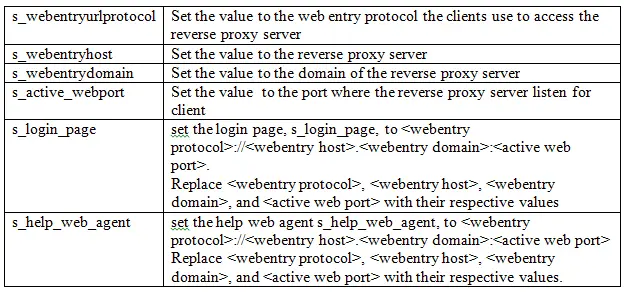
Change the following for Reverse proxy

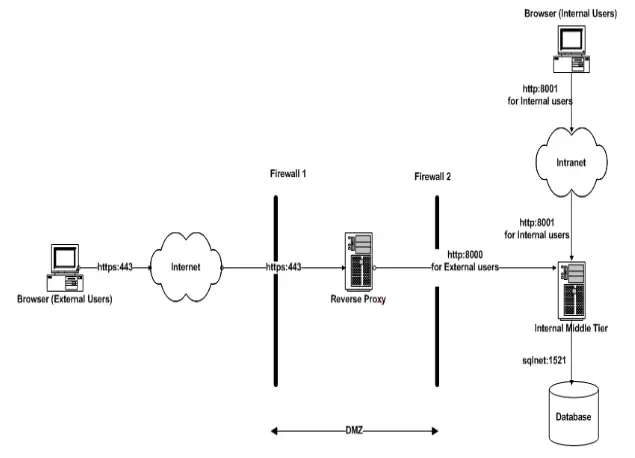
Case B: Using the internal server as the external tier( Internal Server has extra NIC card) with reverse proxy

This configuration requires your internal application middle tier server to have at least two network interfaces. One network interface is required for the external entry point and another for the internal entry point. These network interfaces must be configured to resolve to two different hostnames in the DNS.
For example:
/etc/hosts of Internal Server
192.30.21.1 int.tech.com int
192.30.21.2 ext.tech.com ext
Create the New Context file using the below command
$ perl $COMMON_TOP/clone/bin/adclonectx.pl \
contextfile=$CONTEXT_FILE \
outfile= <name of the output file including location>
Important parameter to be fed
| Target System Hostname (virtual or normal) [int]: | ext |
| Do you want the inputs to be validated (y/n) [n] ?: | Y |
| Do you want to preserve the port values from the source system on the target system (y/n) [y] ? | Y |
Changes required once the context file is created
| AutoConfig Variable | Required Value |
| s_isWeb | YES |
| s_isWebDev | YES |
| s_http_listen_parameter | New Port for the http listener |
| s_https_listen_parameter | New Port for the https listener |
| s_webentryurlprotocol | Set the value to the web entry protocol |
| s_webentryhost | Set the value to the webentry host |
| s_webentrydomain | Set the value to the webentry domain |
| s_active_webport | Set the value to the active port |
| s_login_page | Set the value to point to the new webentry configuration |
| s_server_ip_address | Set the value of this variable to the IP address of the external facing network interface |
(2)Stop Concurrent Manager and all the application nodes
(3) Instantiate the New Configuration Files and Profile Options Based on the New Context File
The DMZ configuration requires the use of the new ServResp profile option hierarchy for the oracle profile options. If you haven’t already done so, change the profile options hierarchy type to ServResp by executing the txkChangeProfH.sql SQL script as shown below:
$ sqlplus apps/apps @$FND_TOP/patch/115/sql/txkChangeProfH.sql SERVRESP
SQL*Plus: Release 10.1.0.5.0 - Production on Thu Sep 5 01:46:59 2016
Copyright (c) 1982, 2005, Oracle.  All rights reserved.
Connected to:
Oracle Database 11g Enterprise Edition Release 11.2.0.3.0 - 64bit Production
With the Partitioning, Automatic Storage Management, OLAP, Data Mining and Real Application Testing options
Changing the hierarchy type for the  Profile APPS_WEB_AGENT
Profile APPS_WEB_AGENT hierarchy type has been successfully changed to SERVRESP
Changing the hierarchy type for the  Profile APPS_SERVLET_AGENT
Profile APPS_SERVLET_AGENT hierarchy type has been successfully changed to SERVRESP
Changing the hierarchy type for the  Profile APPS_JSP_AGENT
Profile APPS_JSP_AGENT hierarchy type has been successfully changed to SERVRESP
Changing the hierarchy type for the  Profile APPS_FRAMEWORK_AGENT
Profile APPS_FRAMEWORK_AGENT hierarchy type has been successfully changed to SERVRESP
Changing the hierarchy type for the  Profile ICX_FORMS_LAUNCHER
Profile ICX_FORMS_LAUNCHER hierarchy type has been successfully changed to SERVRESP
Changing the hierarchy type for the  Profile ICX_DISCOVERER_LAUNCHER
Profile ICX_DISCOVERER_LAUNCHER hierarchy type has been successfully changed to SERVRESP
Changing the hierarchy type for the  Profile ICX_DISCOVERER_VIEWER_LAUNCHER
Profile ICX_DISCOVERER_VIEWER_LAUNCHER hierarchy type has been successfully changed to SERVRESP
Changing the hierarchy type for the  Profile HELP_WEB_AGENT
Profile HELP_WEB_AGENT hierarchy type has been successfully changed to SERVRESP
Changing the hierarchy type for the  Profile APPS_PORTAL
Profile APPS_PORTAL hierarchy type has been successfully changed to SERVRESP
Changing the hierarchy type for the  Profile CZ_UIMGR_URL
Profile CZ_UIMGR_URL hierarchy type has been successfully changed to SERVRESP
Changing the hierarchy type for the  Profile QP_PRICING_ENGINE_URL
Profile QP_PRICING_ENGINE_URL hierarchy type has been successfully changed to SERVRESP
Changing the hierarchy type for the  Profile TCF:HOST
Profile TCF:HOST hierarchy type has been successfully changed to SERVRESP
Disconnected from Oracle Database 11g Enterprise Edition Release 11.2.0.3.0 - 64bit Production
With the Partitioning, Automatic Storage Management, OLAP, Data Mining
and Real Application Testing options
(4) Run Autoconfig all the nodes including External nodes
(5) Run Autoconfig on the Primary internal Nodes
(6) Startup the Internal system
(7) Update Node Trust Level
Set the NODE_TRUST_LEVEL profile option value on the external web tier in your Oracle E-business Suite Release 12 environment to External..
To change the value of the Node Trust Level profile option value to External for a particular node, perform the following steps:
- Login to Oracle E-Business Suite as sysadmin user using the internal URL
- Select the System Administrator Responsibility
- Select Profile / System
- From the ‘Find system profile option Values’ window, select the server that you want to designate as the external web tier
- Query for%NODE%TRUST%. You will see a profile option named ‘Node Trust Level‘. The value for this profile option at the site level will be Normal. Leave this setting unchanged.
Set the value of this profile option to External at the server level. The site level value should remain set to Normal
(8) Update Responsibilities List
After updating the server-level profile value for Node Trust Level for the external web tier(s) to External, users can no longer see any responsibilities when they login via the external web tier. In order for a responsibility to be available from the external E-Business Suite web tier, set the Responsibility Trust Level profile option value for that responsibility to External at the responsibility level.
Login to Oracle E-Business Suite as sysadmin user using the internal URL
- Select System Administrator Responsibility
- Select Profile / System
- From the ‘Find system profile option Values’ window, select the responsibility that you want to make available to users logging in via the external web tier
- Query for%RESP%TRUST%. You will see a profile option named ‘Responsibility trust level‘. The value for this profile option at site level will be Normal. Leave this setting unchanged.
- Set the value of this profile option for the chosen responsibility to External at the responsibility level. The site-level value should remain Normal.
Repeat for all responsibilities that you want to make available from the external web tier.
(9) Start the External Tier and validate the application
adopmnctl.sh start
adoafmctl.sh start
adformsctl.sh start
adoacorectl.sh start
adapcctl.sh start