We have already installed VirtualBox and downloaded the VM appliance in the last post
Now let’s continue with the installation of the 12.2.12 VM template in the Virtual box
1) Check if the Hardware Virtualization is enabled on the Desktop of the Laptop where you have installed the Virtualbox
2) Now Open the Virtual box and click on Import Appliance
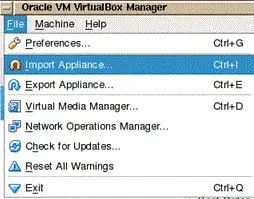
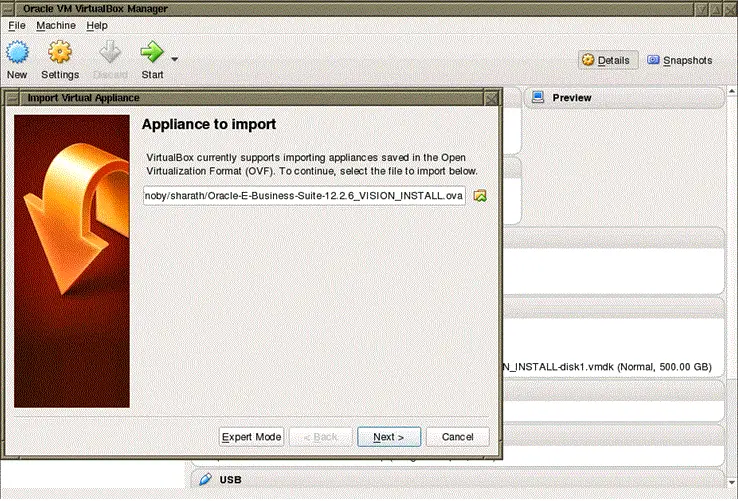
3) The Import Virtual Appliance wizard is displayed.
Click the Choose icon and locate the *.ova file of the virtual machine that you want to import. Click the Next button.
Here the snapshots are given for 12.2.6 but it will be the same for 12.2.12 also
3) edit the ‘Virtual Disk Image’ path to a location with adequate space

Click Import
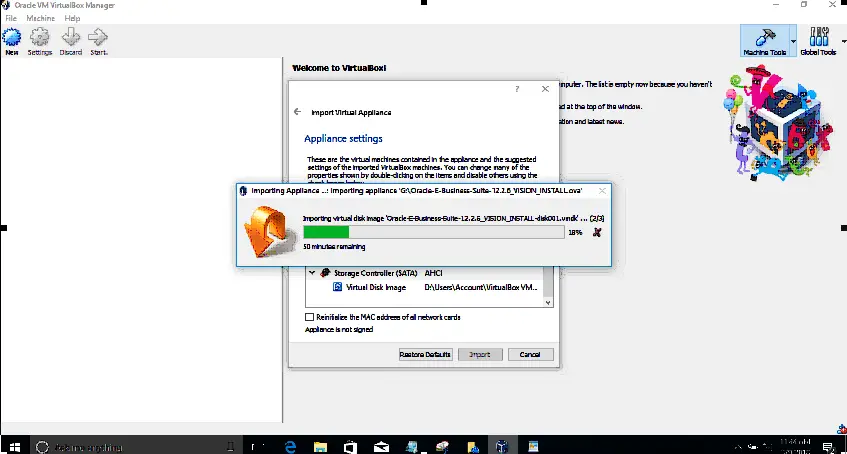
After the process completes successfully, the imported virtual machine is listed in the Oracle VM VirtualBox Manager.
4) Configuring the Virtual Machine
Before starting the Virtual machine, you can change certain settings to suit the requirement.
You can adjust the number of CPUs and the amount of RAM the VM will have. To configure the VM, select the imported virtual machine and click the Settings icon from the toolbar
For network settings, the following things should be considered
a) If you start the VM on a stationary computer on a LAN with DHCP and want the VM accessible from other hosts on your network, you can attach network Adapter 1 as a Bridged Adapter. This will make the (guest) VM get its own IP address, independent of its host. This is the default mode
b) If you start the VM on a laptop computer that may move between networks, or if sharing widely is not required or desired, you should select NAT or Host-Only for Network Adapter 1.
Host-Only allows your browser and SSH client on your laptop access to the VM.
NAT allows you to enable port forwards so that all hosts on your network can connect to the VM (SSH or PuTTY) using the host’s IP address, but beware of port conflict with the host.
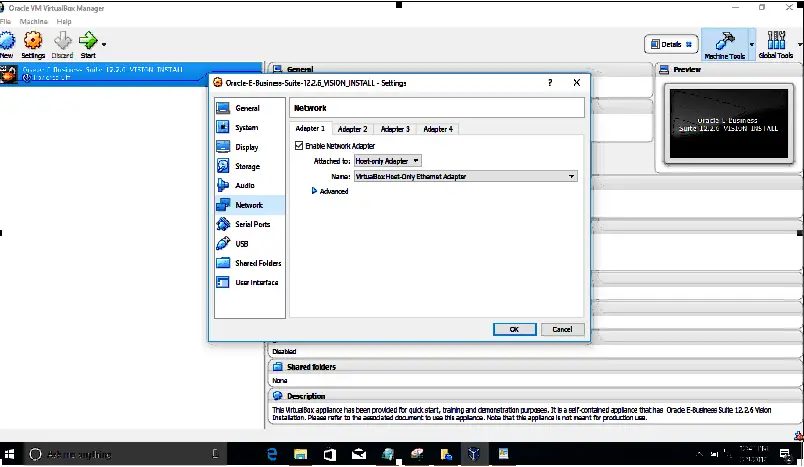
We will be using a Host-only adapter in this case
Click settings and configure host-only adapter in network settings
5) Now start the VM
As the VM boots, you will see a red progress bar at the bottom of the screen. Press the ESC key to see the detailed boot progress. At the end of the boot process, the output will pause for about 10 seconds displaying the IP address and host name information before ending with a login prompt.
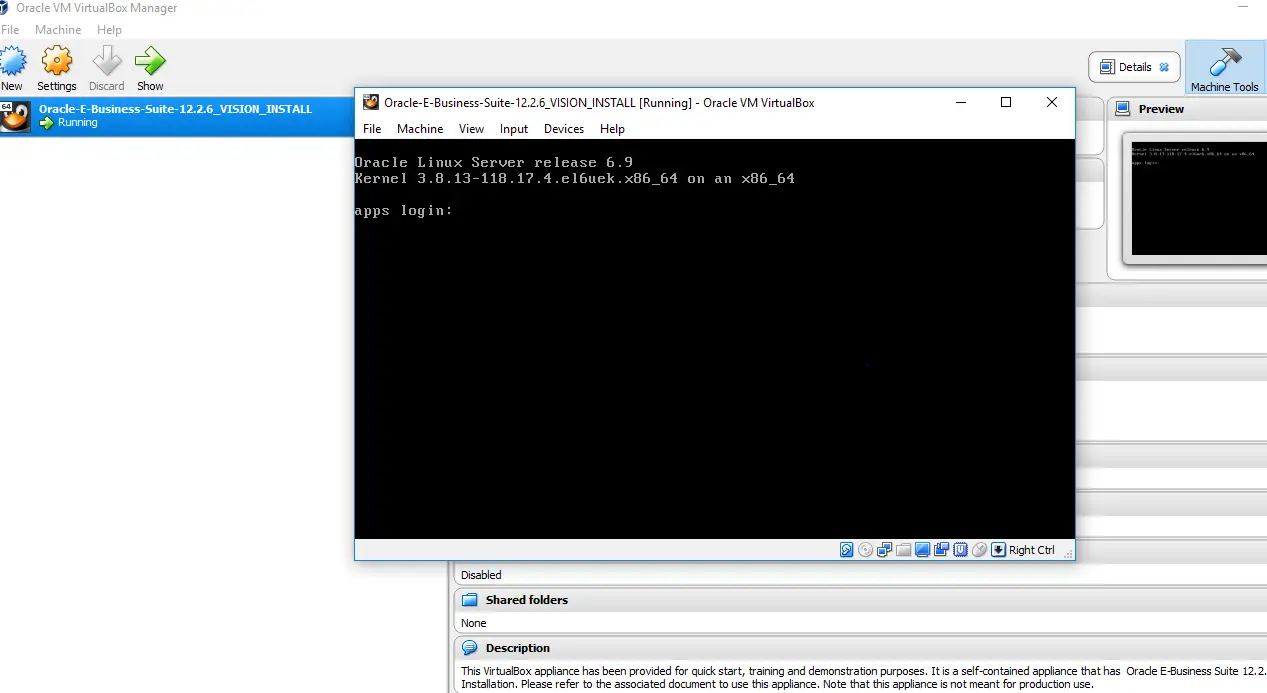
When prompted, enter new passwords for the root, oracle, and applmgr users.

After you set the passwords and IP address if required, the initial login script proceeds to start the database and run Oracle E-Business Suite post-clone steps, including AutoConfig. After that, the database is shut down again. No user input is required during this process

When prompted, select whether to add the start or stop of the database and application tier processes to the OS boot script. Enter VISION to configure the Vision Demo instance.

6) Get the IP address of the VM using ifconfig -a on the terminal and then add it to the window system
To edit the file on your Windows, add a line in c:\windows\system32\drivers\etc\hosts. You can open the file by pasting notepad c:\windows\system32\drivers\etc\hosts. in the Run box in the Start menu. The trailing dot ‘.’ is not optional.
192.168.56.23 apps.example.com apps
7) You can start the database and application service using these options
Option 1
su - root
service ebscdb start
Make Sure Database is Up, then
service  apps start
Option 2
Change the directory to ‘/u01/install/APPS/scripts’ to access the database and application stop / start scripts and run ‘startdb.sh’ and ‘startapps.sh’
- startdb.sh
- stopdb.sh
- startapps.sh
- stopapps.sh
Starting /u01/install/APPS/12.1.0/bin/tnslsnr: please wait…
TNSLSNR for Linux: Version 12.1.0.2.0 – Production
System parameter file is /u01/install/APPS/12.1.0/network/admin/EBSDB_apps/listener.ora
Log messages written to /u01/install/APPS/12.1.0/admin/EBSDB_apps/diag/tnslsnr/apps/ebsdb/alert/log.xml
Listening on: (DESCRIPTION=(ADDRESS=(PROTOCOL=tcp)(HOST=apps.example.com)(PORT=1521)))

Connecting to (DESCRIPTION=(ADDRESS=(PROTOCOL=TCP)(HOST=apps.example.com)(PORT=1521)))
STATUS of the LISTENER
————————
Alias EBSDB
Version TNSLSNR for Linux: Version 12.1.0.2.0 – Production
Start Date 9-MAR-2018 07:42:19
Uptime 0 days 0 hr. 0 min. 0 sec
Trace Level off
Security ON: Local OS Authentication
SNMP OFF
Listener Parameter File /u01/install/APPS/12.1.0/network/admin/EBSDB_apps/listener.ora
Listener Log File /u01/install/APPS/12.1.0/admin/EBSDB_apps/diag/tnslsnr/apps/ebsdb/alert/log.xml
Listening Endpoints Summary…
(DESCRIPTION=(ADDRESS=(PROTOCOL=tcp)(HOST=apps.example.com)(PORT=1521)))
Services Summary…
Service “EBSDB” has 1 instance(s).
Instance “EBSDB”, status UNKNOWN, has 1 handler(s) for this service…
The command completed successfully

addlnctl.sh: exiting with status 0

addlnctl.sh: check the logfile /u01/install/APPS/12.1.0/appsutil/log/EBSDB_apps/addlnctl.txt for more information …

You are running addbctl.sh version 120.1

Starting the database EBSDB …

SQL*Plus: Release 19.3.0 Production on Fri Mar 9 07:42:19 2018

Copyright (c) 1982, 2014, Oracle. All rights reserved.

Connected to an idle instance.
ORA-32004: obsolete or deprecated parameter(s) specified for RDBMS instance
ORACLE instance started.

Total System Global Area 2147483648 bytes
Fixed Size 2926472 bytes
Variable Size 1308625016 bytes
Database Buffers 822083584 bytes
Redo Buffers 13848576 bytes
Database mounted.
Database opened.
Disconnected from Oracle Database 12c Enterprise Edition Release 12.1.0.2.0 – 64bit Production
With the Partitioning, OLAP, Advanced Analytics and Real Application Testing options

addbctl.sh: exiting with status 0

[oracle@apps scripts]$ ./startapps.sh
Starting the Oracle E-Business Suite Application Tier Services
You are running adstrtal.sh version 120.24.12020000.11
…
All enabled services for this node are started.

adstrtal.sh: Exiting with status 0

adstrtal.sh: check the logfile /u01/install/APPS/fs1/inst/apps/EBSDB_apps/logs/appl/admin/log/adstrtal.log for more information …
(8)
Before you can log in, you will need to enable SYSADMIN and the Demo accounts, Oracle have provided scripts to do this
cd /u01/install/APPS/scripts
[oracle@apps scripts]$ ./enableSYSADMIN.sh
This script will let you set a new password for the SYSADMIN EBS Applications User, the default password most likely was “sysadmin”, so pick a different one now.
Enter new password for SYSADMIN:
Re-enter password for SYSADMIN:
Changing password for SYSADMIN
Log filename : L7556909.log
Report filename : O7556909.out
[oracle@apps scripts]$
Enable the demo users also
[oracle@apps scripts]$ ./enableDEMOusers.sh

Enter a new password for the EBS Applications Users, the default password
most likely was “welcome”, so pick a different one now…

Enter new password for DEMO users:
Re-enter password for DEMO users:
Setting password for DEMO users…
Log filename : L7567911.log
…
[oracle@apps scripts]$
9) You should now be able to log in as ‘SYSADMIN’ or explore your Oracle EBS R12.2.12 VISION sandbox environment using the Demo users (see below) and the password defined above using “http://apps.example.com:8000”
Related Articles
Login flow in R12.2 and basic troubleshooting
Important Changes in Autoconfig R12.2
Adop(Ad online patching utility) explained R12.2
Key Technology changes in E-Business Suite 12.2
Oracle E-Business Suite Architecture in 12.2
Step by Step instructions for Oracle Virtual Box Installation
The VM is showing blank screen after updating context value..Any help is appreciated.
do escape,it will show up
Anyone help me how to install r12. 2.6 fully step by step
please let me know how i can help.
I am non-dba skill person, so i need to install R12. 2.x in my laptop for practice purpose my laptop configuration is I3, 1tb hdd and 12ram, please reach me @ [email protected]– your inputs much appreciated
Sure
Hi Techgoeasy,
Hi Team, Successfully i have installed R12.2.6 on my system, with help of yours supports.
Whenever i am facing the issue you people are amazing support for me to resolve the issues whatever its,
I really appreciated and thank to you for the support team.
Especially thank to ‘Jatin’ I am really happy for your support.
showing temp file creation failed while running create accounting programme. any solution?
java is not loading, I have another instance which launches java correctly…
Use the below URL
http://apps.example.com:8000/OA_HTML/oaj2se.exe
It will download java and you will prompted to install it.
Once installed ,form will open
I followed all steps mentioned in blog and able to login to operations user but when I click on Home getting message. what to do?
Error Page
You have encountered an unexpected error. Please contact your System Administrator for assistance.